Daily users of Microsoft Dynamics NAV (Navision) or Microsoft Dynamics 365 Business Central have their routines down to a science, especially their month-end and year-end close procedures. But what if there were tips and tricks they could learn that would make their job much easier?
In this article, we’ll cover insights to help you streamline your tasks in the following areas:
- Year-End Close Preparation (Month-End Close Tips)
- Year-End Close Process
- Reporting and Analysis
If you’d rather, you can watch the webinar outlining the tips and tricks here:
Prepare for Year-End Close
Preparing for Year-End close and optimizing your process starts with familiar month-end closing tasks, such as:
- Posting all open activities, including:
- Production Orders
- Sales Orders
- Purchase Orders
- Journals, etc.
- Updating the exchange rate for customers and vendors that need to invoice or be invoiced in foreign currencies
- Consolidating multiple companies, if applicable
- Reconciling accounts, including:
- AP
- AR
- Inventory
- Cash
- Revaluing inventory, if necessary
There are several tricks to make the process even more seamless.
Managing User Tasks: Business Central has an out-of-the-box solution to help you and your users remember what needs to be completed. These user tasks can be found on the Business Central Dashboard. Here, you can create tasks to remind you what needs to be done. You can create them for yourself and assign them to other users or a user group. You can also have tasks assigned to you by other users in your company. 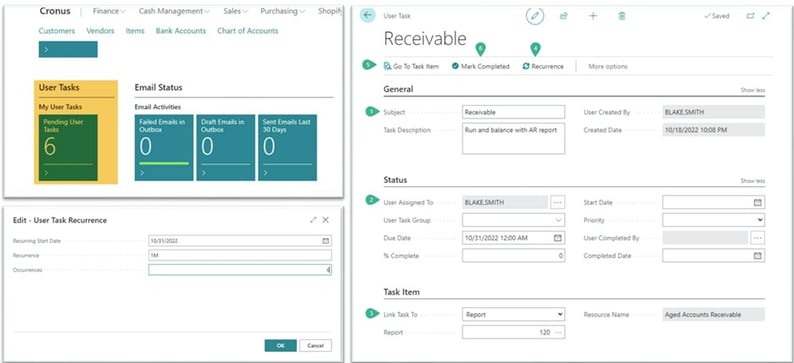
You’re required to fill in primary fields to create the task, such as subject and user assigned to. Additionally, you can add a link to a task and link a task to a report or page.
You can set these tasks to recur, saving you from having to create a new one for every month-end close. Use the recurrence button at the top of the page and define the start date recurrence. This will create alerts on the Business Central main page.
To run the report from one of these tasks and mark it complete, when you click on the task, go to ‘Task Item’. This will open the ‘Report Options’ page. Run it as you normally would. It will bring you back to the user task. There, you can use the ‘Marked Completed’ button or enter one hundred percent in ‘Percent Complete’.
When you back out of the page, the task will be marked as completed.
Managing Posting Periods: Closing the year doesn’t prevent users from posting to closed periods in Business Central. Users can post to any date if there’s no restriction. Additional configuration is required to ensure users only post to specific periods.
To use General Ledger Setup:
- Choose the search icon and enter ‘general ledger setup’.
- Choose the related link on the General Ledger Setup page.
- Define the period by entering the dates in the ‘Allow Posting From’ and ‘Allowed Posting To’ fields.
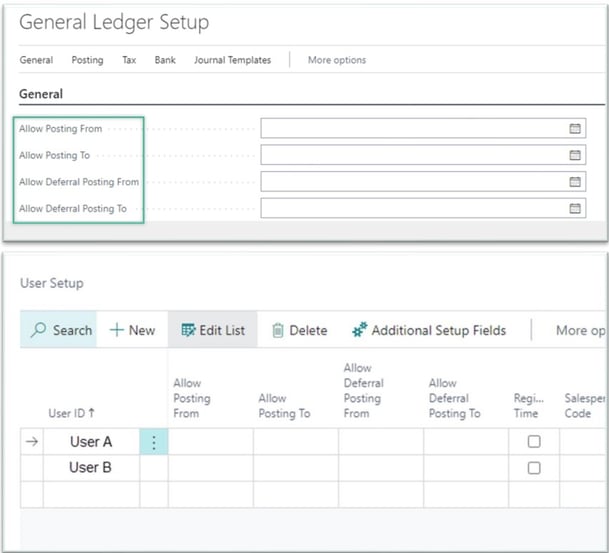
These posting periods apply to the company and to all users. Any date outside of the range is restricted and you'll get an error message.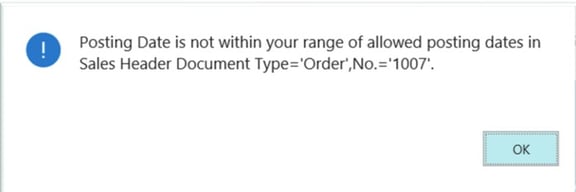
You may also need to allow certain users to post in a prior month. User Setup can be used for exceptions. You can define different posting periods for specific users. These posting periods override those specified in the General Ledger Setup Page, which can be useful for audit entries that have to be made after closing.
Creating a New Year: Since you've restricted users to a new period, you need to create the new year. To do this quickly and automatically:
- Choose the search icon, enter ‘accounting periods’ and choose the related link.
- Click ‘Process’ and select ‘Create Year’. This will open the Create Fiscal Year window.
- Define the period, the starting date, number of periods (12 for one year, 24 for two) and period length (fiscal month length).
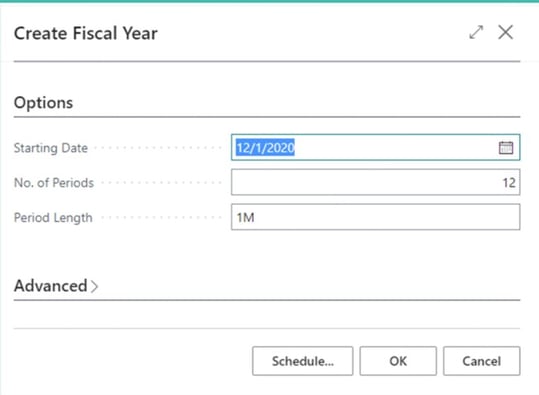
The fiscal month length in this case is '1M’ for monthly.
The New Fiscal Year field indicates the month your fiscal calendar year starts. 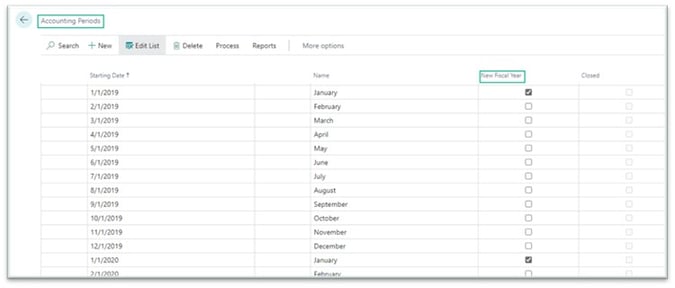
It’s best practice to have two fiscal years open at a time: the current year and the next year. This will help with deferrals or projections done for fixed assets. However, Business Central only requires one year to be created before it will allow you to close a fiscal year.
Also, you can have ’4-4-5' accounting periods (4 week/5-week period lengths). This divides a year into four quarters of 13 weeks, each quarter would consist of two four-week months and one five-week month. With this type of business process, you’d have to enter them manually in the accounting period table. So, the above process wouldn’t be helpful in this case.
Process Year-End Close
Next, let’s look at how to process the year-end close.
- Choose the search icon, search for ‘accounting periods’ and click the related link.
- Click ‘Close’ and Business Central will go to the oldest open year.
- Click ‘Yes’ and the year will be marked as closed.
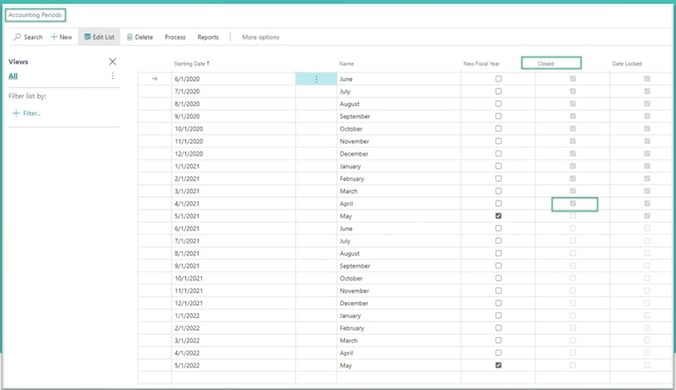
It’s recommended to close your year on time. The close process can’t be reversed, so you won’t be able to reopen the year. But that doesn’t prevent a user from posting to a closed year. If you have any audit or post-close entries, they’ll be labeled in Business Central as a post-close entry.
When a year is over, you must close the periods that define it. To do this, you run the ‘Close Income Statement Batch’ job. To access this, go to the Chart of Accounts and under ‘Process’ select ‘Close Income Statement’. This transfers the year’s results to an account in the balance sheet and closes the income statement accounts. It’s the formal process of zeroing out your profit and loss accounts and moving the amounts to retained earnings. 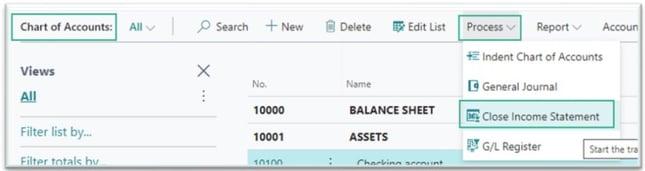
Close Income Statement Batch will close accounts where the GL account type is ‘Income’. If accounts are set as ‘Balance Sheet’, the process will be off.
Business Central does make this more user-friendly and will create a general journal entry for you. But you still need to review and post this entry.
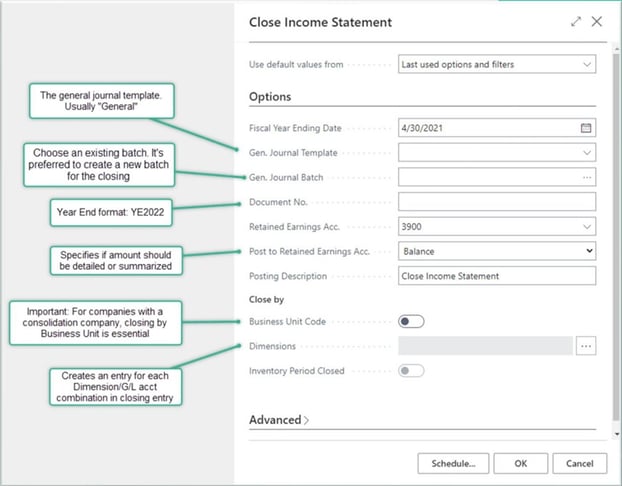
In the Close Income Statement option window, there will be fields to fill out. You must:
- Indicate the general journal template to use, which is typically General.
- Specify the batch. It’s preferable to create a new batch, but you can use an existing one.
- Define the document number using something to indicate the year-end close, such as YE2022 to indicate year-end 2022.
- Specify if the amount should be detailed or summarized using the options under Post to Retained Earnings Account.
- Balance will create one line for retain earnings and give the roll-up amount
- Detail will post the itemized net impact to the retained earnings account
- Close by Business Unit Code will only be active when you’re closing the year inside a consolidated company. If you’re not inside a consolidated company, it won’t be active.
- The roll-up amount is then transferred to the general journal batch that you indicated earlier.
Once posted, you have completed your year-end close in Business Central.
Reporting and Analysis
To make it easier to work with the closing entries, try these reporting and analysis tips.
Data Filtering Options:
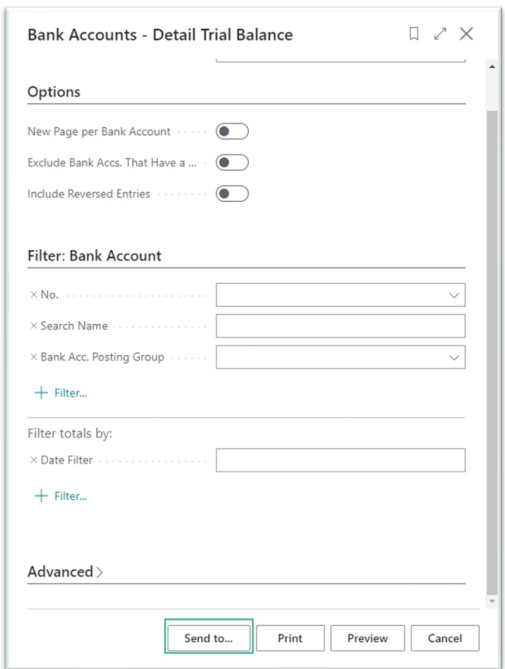
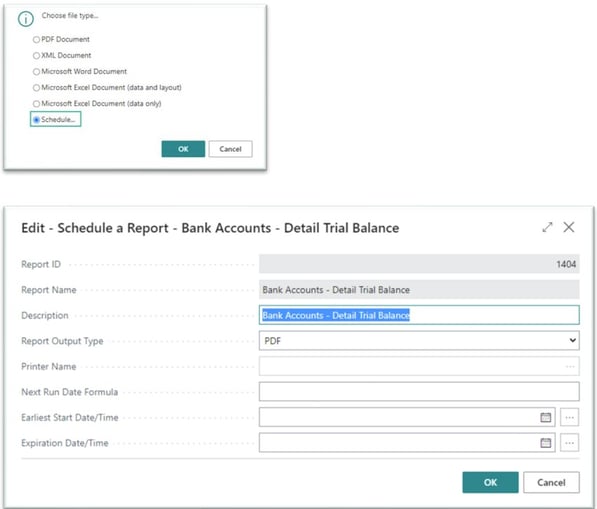
You can use the GL Account Balance list from the GL account card or the Detail Trial Balance report. As an example, you can use the option fields presented in Detail Trial Balance to simply include or exclude closing entries with a click. 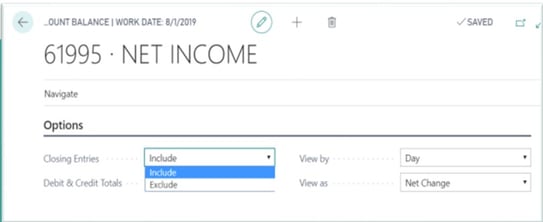
How can you identify closing entries? You can use the Date Filter and specify the closing date format, such as: C12/31/2021, to search for entries with this date. 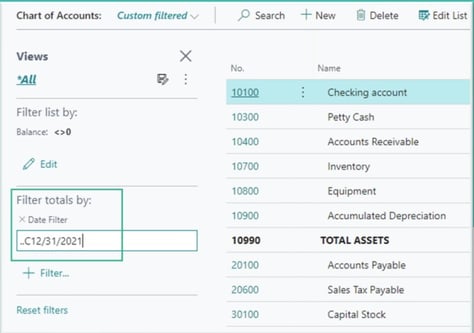
How can you tell if something is a post-close entry? When entries are made later in the general journal, after you close the year, there will be an indicator on the underlying table that will mark it as a prior-year entry. You can search for this on the GL entry table. To view it, you need to use Page Inspection, a tool that allows you to see what page and table make-up you’re looking at. 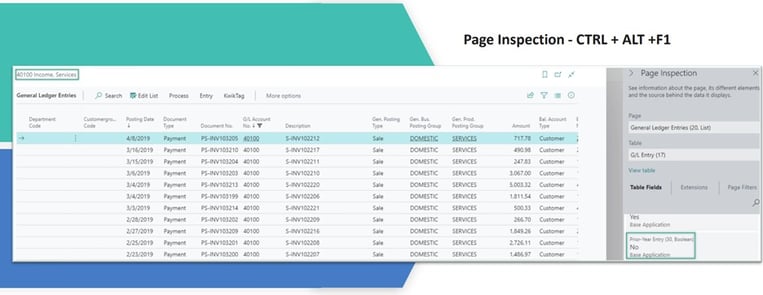
For example:
- Go to Chart of Accounts and drill into a Balance.
- Select your entry and then hold Control-Alt-F1.
- This will bring up the page inspection table.
- Search under table filters for prior year entry and see if this entry was made after year close.
Which pre-close year-end reports are most helpful? First off, when dealing with accounts payable, two great reports are:
Aged Accounts Payable Report, which shows which payables are current, past due and potentially reaching delinquency. You can use this information for either investigating, following up on or reversing by credit memo any past-due posted payable. You can filter this report by vendor posting group and use those totals to reconcile the sub-ledger account payable balance to the corresponding payable balance in the GL. 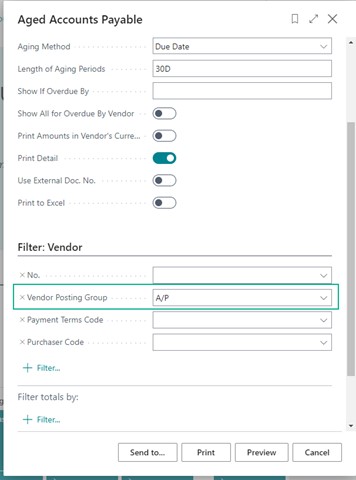
What are the reporting options?
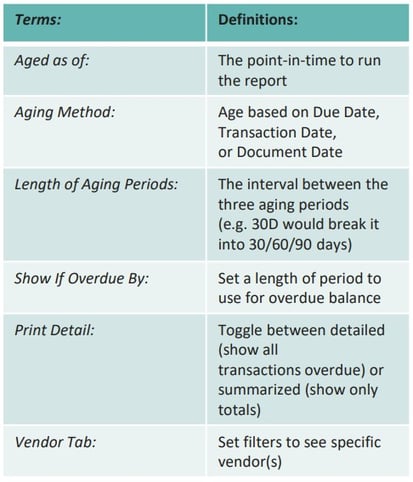
- ‘Age as of’ is the point in time you’re running the report.
- ‘Aging method’ can be based on due date, transaction date or document date.
- Length of aging period’ is however you’d like to define it.
- Show if overdue by’ is a length of time to use for overdue balances.
Reconcile AP to GL Report shows anything that has been received through purchase orders but has not been invoiced. These items will consequently not exist in your general ledger because the invoice amounts have not hit the GL. 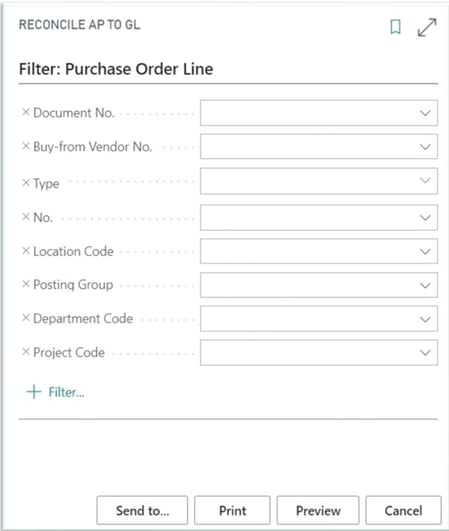
Microsoft Dynamics Makes You Efficient, these Tips and Tricks Make You FAST
Microsoft NAV and Microsoft Dynamics Business Central make every day processes, especially year-end close processes, faster and easier. Knowing all the tips and tricks speeds up the process and makes tasks easier to execute.
For more tips on how you can become more efficient using Microsoft NAV and Microsoft Dynamics Business Central, go to the next blog in this series, Microsoft Dynamics Year-End Close: US Payroll Edition (coming soon!).