Updating and deleting Users in Dynamics SL are common maintenance items, as employees’ roles can change, or they may simply no longer be a part of the organization.
In Part 1 of this series, we covered how to create Users in Dynamics SL. Part 2 of this series, we will cover how to update an existing User’s permissions as well as what to consider when deleting a User account from Dynamics SL.
Please Note:
Dynamics SL Access Rights are unique to every installation. There are no “pre-packaged” Groups or rights, excepting the built-in Everyone Menu Group and Administrators Group – neither of which can be altered. So, bearing these points in mind, I will be reviewing User Administration under the assumption that Access Rights are already fully established in your installation.
User Updates
As you may recall from Part 1 of this series, we covered the four primary steps to creating a new User. We now need to consider the steps to update existing Users.
Let’s say there is a User that has been promoted from a “Clerk” to a “Manager," replacing another User that has departed the organization. This would entail changes to the promoted User’s permissions, which hopefully reflect the different levels of rights needed for defined job functions according to the Access Rights design for the organization.
Step 1: Log into Microsoft Dynamics SL as an SL Administrator. (The SL Sysadmin User or any User account that is a member of the built-in Administrators Group).
Navigate to and open: Administration > System Manager > Security > User Maintenance.
Note: If the Administration menu band is not visible, then you are likely not logged in as an Administrator.
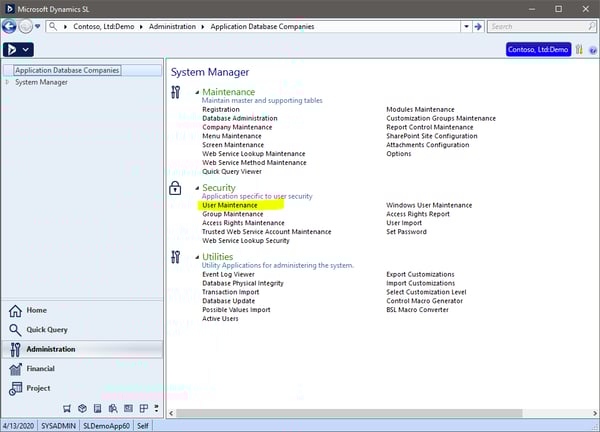
Once opened you will see the screen below. To load the existing User account to screen for Update, type F3 on User ID, then select the User ID that needs to be updated. Their information will populate to the screen.
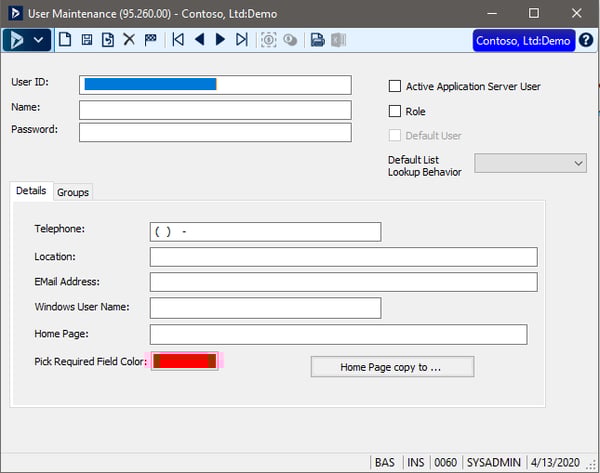
Step 2: Update and Adjust Group Memberships
Navigate to the Groups tab directly right adjacent to the Details tab. Displayed here are the Groups that are currently assigned to the User and this is where they can be adjusted.

Admins can add and/or delete Groups from this User’s Group list by either deleting the selected Group displayed in the grid; or Add them by clicking F3 on the Group ID cell, then selecting the appropriate Group for the User to reflect their promotion. It will always be one Group ID per row in the Groups grid.
Generally speaking, when an SL User takes over the role of another, copy the legacy User’s Groups as a pattern, assuming they will have the same job functions.
*TIP: You can have the screen open for both Users. Then copy Groups using CTRL+C from one User record and paste to another using CRTL+V.
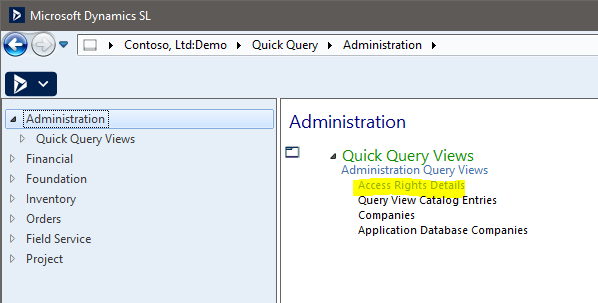
If there isn’t a pattern User to leverage, an evaluation of existing Access Rights can be done using the Access Rights Details Quick Query, (see Step 3 below), to determine what Group memberships need to be considered for the promoted User.
It is also important to acknowledge that because Access Rights can be built in many ways, it’s possible that rights may be cumulative, or acting in concert together. This means that a User may just need Groups added to augment their existing rights.
If there is doubt regarding actual defined rights, Users can remain members of both higher and lower “tier” Groups, as Dynamics SL Access Rights do not leverage Denial rights, only Grant rights. As such, the highest rights granted always prevail since nothing is denied.
Lastly, it is never recommended to remove the “EVERYONE” Group. This Group allows Users to see all standard menu items that they are entitled to via their actual Access Rights.
Once the updates to the User’s Groups are completed, save the configurations by pressing the Save button on the tool bar or by typing CTRL+S. This commits the User’s settings to SL.
Step 3: Test their Access Rights.
Just like when creating a new User, there are times when the screens or processes may not work as expected. To determine why, I recommend reviewing the Group assignments to ensure they fit the User’s role. To get more details on what each Group is configured to do, use the Access Rights Details - Quick Query report. It can be found under Quick Query > Administration > Access Rights Details. When filtering it on “Relationship” it will give the details on each Group’s Access Rights in SL. Filtering on the User will show their full Access Rights report. This will help in determining if there are holes in their permissions and changes that need to be made.
Once the User reports back that all works well, you have completed the updates to the User account in Dynamics SL.
User Deletion
Lastly, completing our example scenario above, we also have a User that has departed the organization. Depending on your organization’s User Audit requirements, you may or may not decide to delete a User from Dynamics SL.
It is a common question as to whether deleting a User will negatively impact any data they created. In short no, it will not. All their transaction data will remain intact and available. However, at times, security auditors will indicate that they do not want Users deleted, as they can then no longer review what permissions they had. So, bear this in mind when making the decision to keep or delete a User from Dynamics SL.
It is important to note that if Windows Authentication is being used (Windows User Name is populated on User Maintenance), then deactivating the User in Active Directory renders the account inert and it will no longer have access to SL. When SQL Authentication is used (no Windows User Name provided to SL), then I recommend resetting the User’s password in User Maintenance to eliminate access to SL, assuming deletion is not the desired option.
If, in the end, the decision is made to delete the User from Dynamics SL, it is very easy.
Step 1: Load the User Account
Simply load the User Account to screen on User Maintenance. You will use F3 on User ID to bring up the User list, then click the User you want to delete and click OK. This will load the records to screen.
Step 2: Remove the Account from SL
From there, delete using the “X” on the toolbar. This will remove the account from SL and all assigned Groups. It will not remove any data they created in SL.
That completes Part 2 of User Administration in Dynamics SL. Hopefully this guidance will empower you to continue to take command of these tasks. If at any point you find that the directions or recommendations don’t quite fit your organization’s specific needs or you have questions regarding nuances not covered here, please do not hesitate to reach out to ENAVATE Customer Care for more guidance and support!
Looking for help from Dynamics experts? Enavate is a Microsoft Gold Partner with a team of 300 specialists. We implement and support Dynamics and guide over 1800 organizations with best practices.

About the Author

Paulette St George is a Senior Technical Professional, Customer Support, for Enavate Managed Services, a DXC Services Partner. She has more than 25 years of experience in back office technology with a primary focus in Microsoft Dynamics SL and related solutions. She has served as a solution architect and designer, as well as developer. Currently she functions as a Senior Technical Consultant for ENAVATE by supporting Microsoft Dynamics, Microsoft SQL Server as well as varied Procurement solutions and Business Intelligence reporting technologies. She enjoys spending time cooking and creating healthy, clean and exciting meals, and spends much of her free time reading and researching many different topics of interest from Astronomy, Food Science and even Homeopathic Medicine. She lives in Southern California splitting her time between Orange County and Big Bear Mountain, enjoying the beautiful and varied weather SoCal has to offer.