This blog is Part 2 of the "Own Your NetSuite" series, which focuses on features, functions and tricks every NetSuite user should know to get the most out of the platform. See Part 1 on Analytics Workbooks here.
Welcome back! In Part 1 of this series, I introduced you to the wonderful world of Analytics Workbooks. Now that you’re familiar with the basics, let’s make things a little more interesting. In this post, you’ll learn to create your own Dataset and Workbook from scratch.
Setting the Stage
For today’s exercise, let’s use a sales scenario: Your team leader asks you to have a single place where she can see the following sales information:
- A list of team members ordered by how much they sold this year.
- The same list as above, but sales by customer instead of by team member.
Friendly note: Always look at the existing workbook templates before building anything! But, for the sake of this exercise, let’s pretend those templates don’t exist.
Creating a Dataset for a NetSuite Analytics Workbook
Let’s start by creating the dataset. As a reminder, the dataset is the table of information that will be used by the Workbook.
- To start a new Dataset, go to Analytics, then click on Datasets, and then New Dataset:

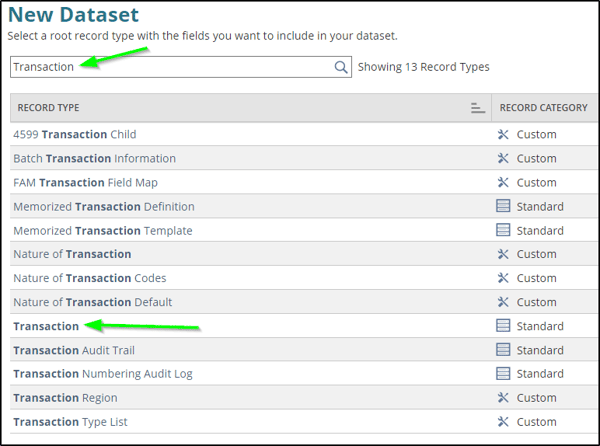
- The New Dataset page will ask you to choose a Record Type. In this case, we need to build transactional information, so we’ll pick the Transaction Record Type by searching for Transaction in the search bar and then clicking on Transaction.
The next page is where things can get a little overwhelming. Don’t worry! It’s not as complicated as it seems. Here’s a handy reference.
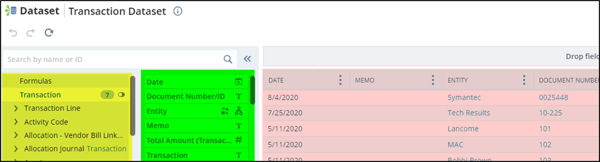
The yellow section is where you choose the record you want to select a field from. In our example, it defaulted to Transaction. But say you wanted to show a customer’s email address. In that case, you’d choose Entity Customer here.
The green section is where you select the field you want to include in the dataset. You can drag and drop the field onto the Dataset Preview (the pink section in the screenshot above).
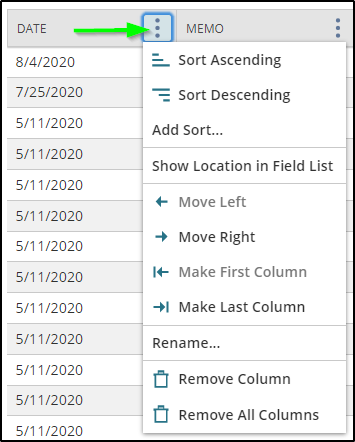
The pink section on the right is what I call the Dataset Preview section. This is where you see a preview of the data in a table format. Notice that NetSuite already included some fields there by default, such as Date and Memo. You can move the fields around by clicking on the header, dragging and dropping them where you want them. You can also click on the three dots beside a header to get several options for moving and formatting fields, as seen here.
- To continue with our example, let’s add Sales Rep to our dataset. Search for Sales Rep in the field search. Then drag the Transaction: Sales Rep field into the Dataset Preview.
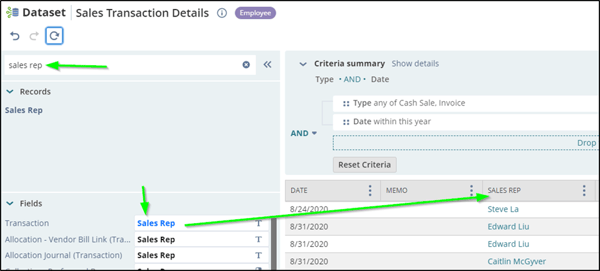
Our next step is to filter our results. We only need this year’s sales. Right now, our dataset includes all transactions in the system. Let’s add criteria on Transaction Date and Transaction Type to limit our results.
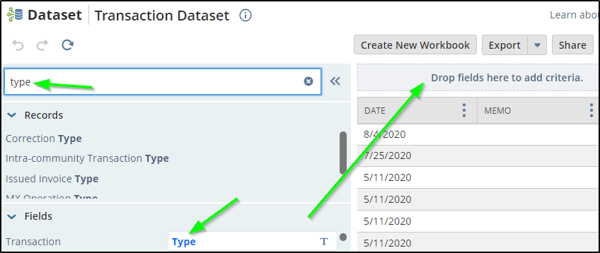
- First, find the Transaction Type field by entering Type in the field search. Then drag the Transaction: Type field into the bar above the Dataset Preview The section should say “Drop fields here to add criteria,” as shown in the example.
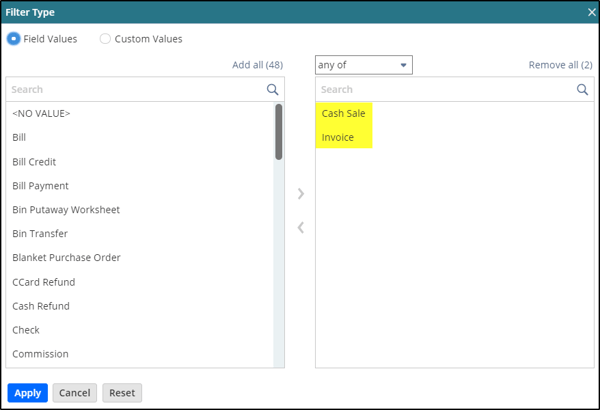
- Once the Transaction: Type field is added, a Filter Type pop-up should appear. Double-click on both Invoice and Cash Sale. This should send those transaction types from the left section (your options) to the right section (your selections), as shown here.
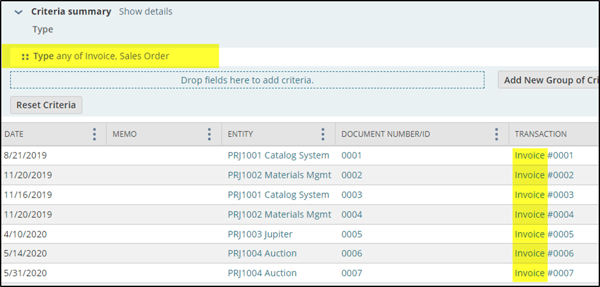
- Click the blue Apply button to continue. Your new criteria should be added to the top where highlighted in the example below, and the Dataset Preview should now only show Sales Orders and Invoices.
- With similar actions, let’s limit our results to this year’s transactions. Just like we did for Transaction Type, try adding Transaction Date to the criteria bar, as shown below.
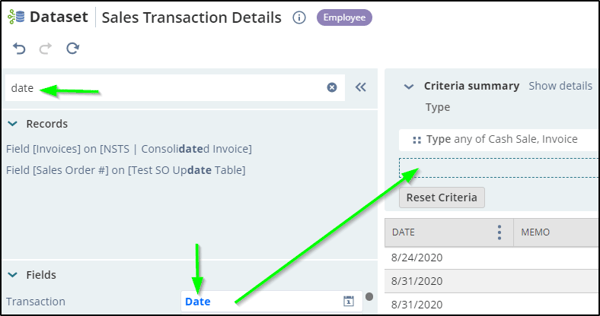
- When the pop-up is displayed, click on Date Ranges, pick This Year and click the blue Apply button, as shown here.

We could add several more criteria, such as excluding unapproved transactions, but for the sake of the example, let’s keep it simple and move on.
- To save our new dataset, click the blue Save button in the top right, give the dataset a name (for example, Sales Transaction Details), and click Save one more time. You should get a satisfying “Dataset has been saved” pop-up message in the top right, as shown here.

Congratulations, you’ve created your first dataset! That said, a dataset is useless until you use it in a workbook.
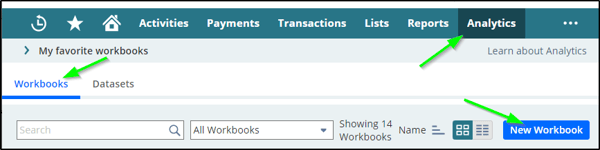
Creating a Workbook in NetSuite
Let’s create a workbook that uses the newly created dataset.
- To start, click on Analytics, then Workbooks, and finally, click on the blue New Workbook button on the bottom right-hand side.
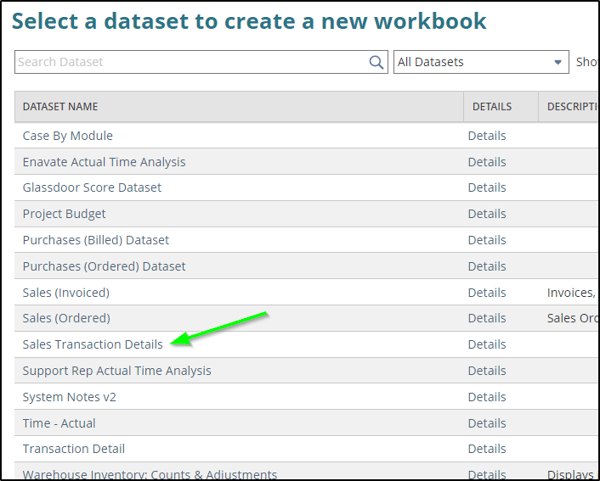
- On the next page, select the dataset we just created (Sales Transaction Details).
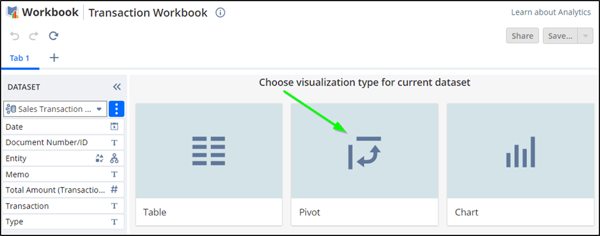
- On the next screen, there are options for visualizing the dataset. Let’s pick the Pivot
- Drag the Entity (Sales Rep in this example) onto the Rows Drag Total Amount (Transaction Currency) into the Measures section, as shown here.
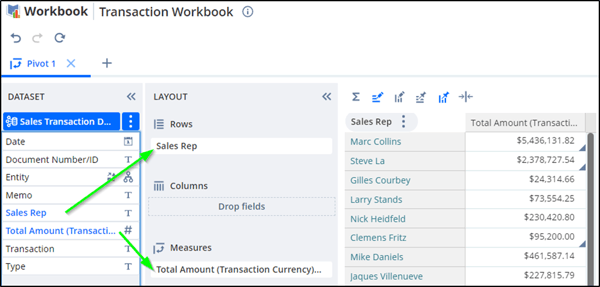
- If you deal in multiple currencies, click on the three dots beside Total Amount (Transaction Currency), and choose Currency > Apply Conversion, as seen here.
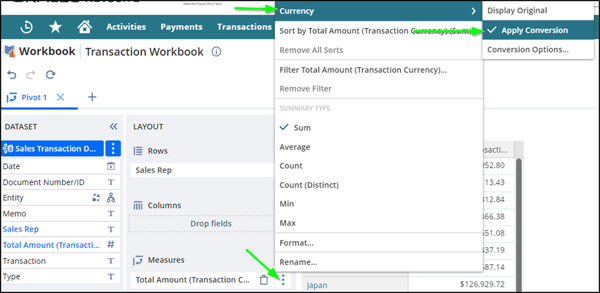
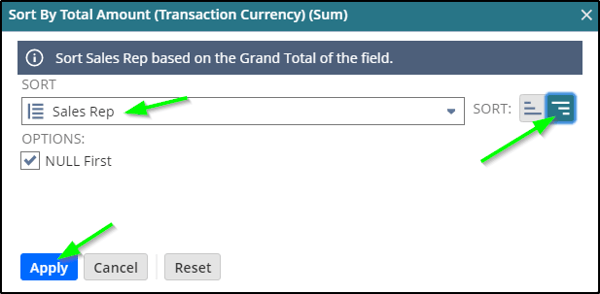
- Finally, let’s sort our results to show the reps with the highest numbers first. Click on the same three dots beside Total Amount (Transaction Currency), then Sort by Total Amount (Transaction Currency) (Sum). In the pop-up, choose Sales Rep (it should already be selected), click on the Descending icon, then click on the blue Apply
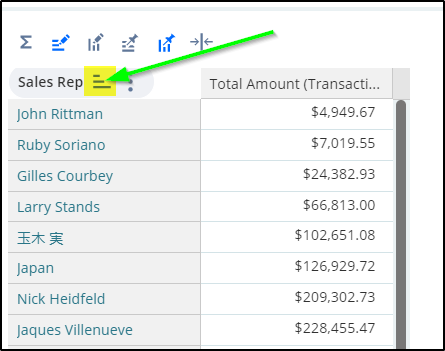
Now, when I was testing this out, my results still ended up in ascending order. To fix it, I had to click on the Ascending/Descending icon on the Sales Rep column header highlighted here.
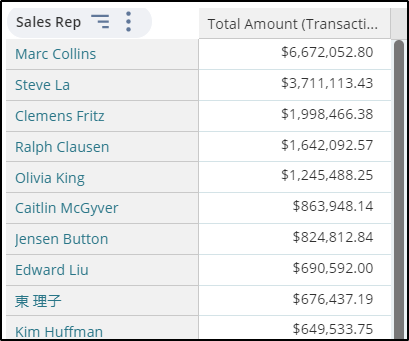
Once you’re done, the results should look like this.
- Make sure to click the blue Save button in the top right to save your new Workbook!
That’s it for this blog about creating datasets and workbooks in NetSuite. “But wait Mat,” you might say. “What about the second report, annual sales by customer?” Well, I think you have all the skills you need to figure that one out on your own.
As always, if you have any questions or comments, please do not hesitate to reach out to the Enavate team.
About the Author
.jpg?width=249&name=Enavate_Selfie_Mat_Goodman%20(for%20site%20use).jpg) Mathieu joined Enavate in January 2020 with 13+ years of NetSuite experience. His current role of Solution Consultant consists of demonstrating the awesome features of NetSuite to the world. He’s also an avid gamer and craft beer aficionado.
Mathieu joined Enavate in January 2020 with 13+ years of NetSuite experience. His current role of Solution Consultant consists of demonstrating the awesome features of NetSuite to the world. He’s also an avid gamer and craft beer aficionado.