In Microsoft Dynamics GP, there are often multiple ways to perform the same task. At Enavate, we’re all about less clicks and working smarter, not harder. We regularly review solution updates to assess what new functionality will assist our clients and make their lives easier within their ecosystems.
We hosted two multi-part webinar series covering tips and tricks to help users be more efficient and productive in Microsoft Dynamics GP. Here, we compiled a list of what are the most beneficial keystrokes that you can do on Dynamics GP for maximum efficiency. Listed are the ways that you can improve your processes in Microsoft Dynamics GP.
Click on the links below to navigate to the tips and tricks that best suit your needs.
Table of Contents
Make Your Home Page Your Go-To
Reconcile Sub-ledgers to the General Ledger
Customize Lookups and Sorts in Microsoft Dynamics GP
Run Reports More Efficiently in Dynamics GP
Shortcut for Customer Refunds in Dynamics GP
Streamline Processes in the Dynamics GP Finance Module
- Correcting Journal Entries
- Checkbook Balance Inquiry
- Control Accounts
- Date Creation
- Account Rollup Inquiry
Administration Module Tips in Dynamics GP
Clean-up Auto-Complete Suggestions in Dynamics GP
Microsoft Dynamics GP Tips for Home Pages, Smartlists and Reconciling Ledgers
In this first video, you’ll learn:
- How to make your Home Page your go-to for all Microsoft Dynamics GP modules.
- What SmartLists are and why you need them.
- How to use a tool for reconciling sub-ledgers to the financial ledger.
Make Your Home Page Your Go-To
You can set up your Home Page so it’s most efficient for your daily needs, reducing the number of clicks it takes per task and cutting out repetitive work.
Navigation: Menu Bar vs. Navigation Pane
There are two basic ways to navigate around Microsoft Dynamics GP. One is the Menu Bar at the top and the other is the Navigation Pane down the left-hand side.
Menu Bar
Pros
- Familiar because it’s Microsoft’s original navigation menu style
- Similar to other Microsoft software navigation
Cons
- Multiple clicks needed to get to a screen
- Need to click, hold and drag
- Easy to lose your place and need to start again
Navigation Pane
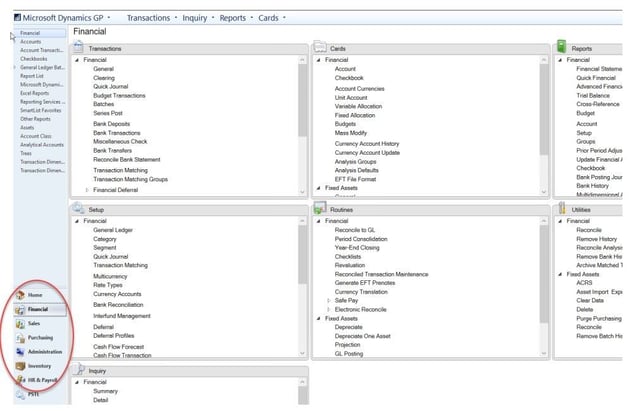
Pros
- Less clicks
- Very visual
- You can customize your Home Page to add links and simplify usage
- Same look from module to module
Cons
- Can seem overwhelming
Note: Out of the box, you have a basic toolbar, but you can also customize this toolbar by creating shortcuts.
Switching Between Companies
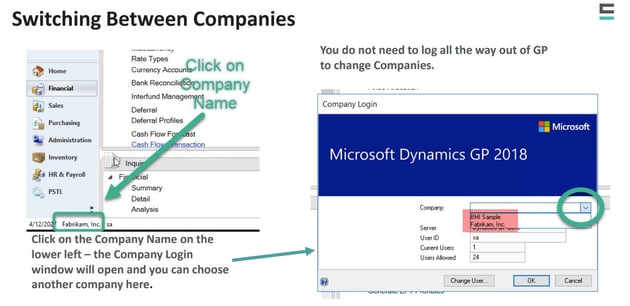
If you work in multiple companies, you don’t have to log out of one and back into the other. Simply click on the company name in the bottom left and the Company Login window will pop up. Use the dropdown to see the companies you have security access to. Once you click on another company, after taking a few seconds to populate, you will have switched to that company.
User Preferences
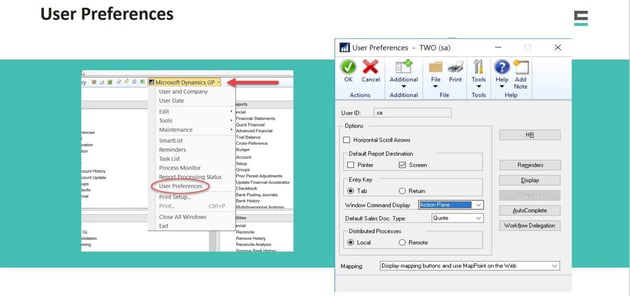
Many people aren’t aware of the User Preferences options. You can navigate to Microsoft Dynamics GP from any module by clicking it in the top toolbar. From here you select User Preferences, and a window will pop up with several options. Here, we’ll highlight a few of the most useful.
Default Report Destination: Printer or Screen
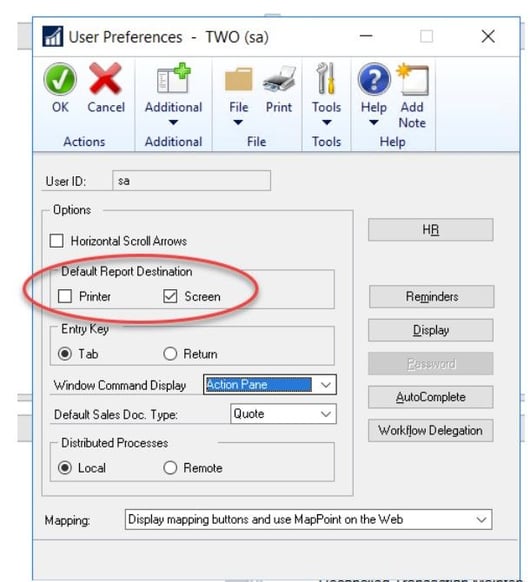
If you constantly get a window asking where you want your report to print, either the Printer or the Screen, you can set your default in User Preferences. If you set Screen as your default, it will always default to Screen. This reduces clicks and saves time. Posting journals aren’t affected by these settings. This works for some reports, but not all.
Enter Key: Tab vs. Return
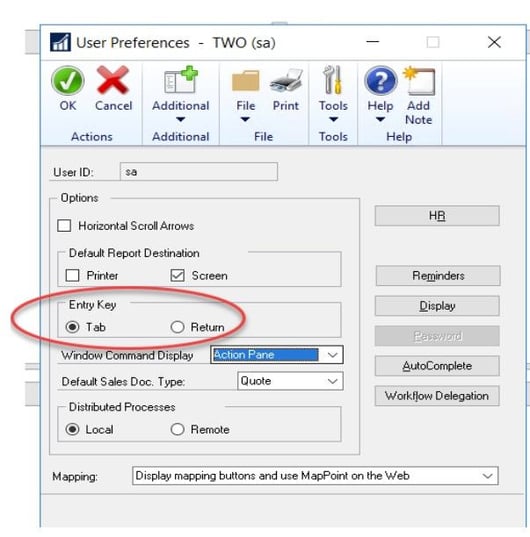
Dynamics GP defaults to the TAB key as your ENTER key, meaning how you get from field to field. If you're used to hitting ENTER or RETURN to get from field to field, you can turn on that option. This is user specific, so it only affects your user ID.
Windows Command Display
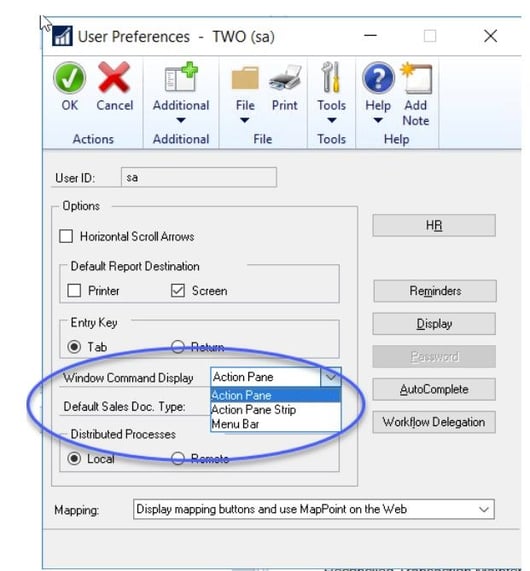
A few versions ago, when Action Panes were introduced in Microsoft Dynamics GP, this choice was added to User Preferences. This gives users three options for their menus on Windows:
- Action Pane(the large icon action panel)
- Action Pane Strip (the small icon action panel)
- Menu Bar (the way the windows used to look)
Note: Any change here requires the user to close Microsoft Dynamics GP and re-launch.
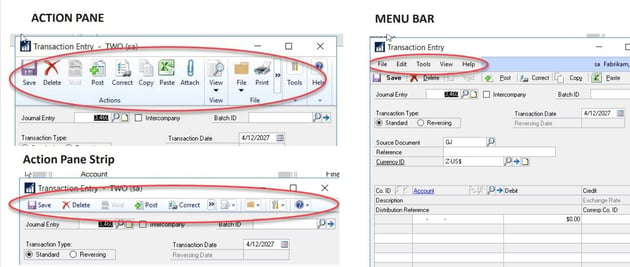
Examples of Window Command Displays
Default Sales Document Type
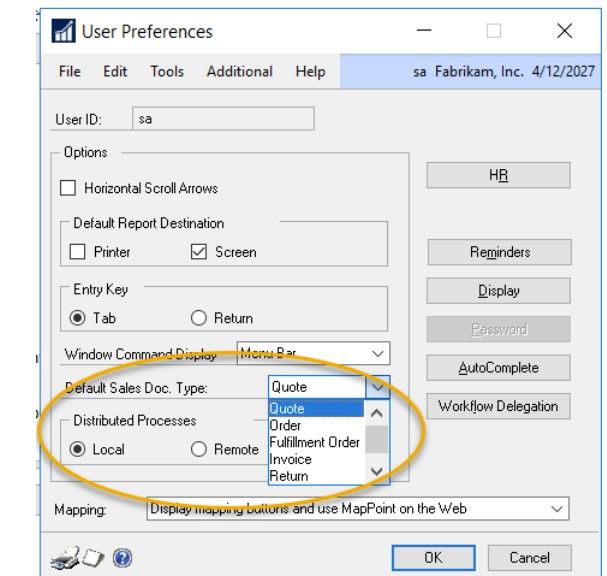
If you're using Sales Order Processing in Microsoft Dynamics GP, you can set a default type for SOP documents. For instance, say your choices are Quote, Order Fulfillment, Order Invoice or Return. If your company doesn't use Quote, set Order as your default type and it will default to Order. This is also user specific. If you just do invoicing, you may want to set your Sales Document Type to Invoice to save time. The intent is to select whichever SOP Doc Type you use most often in your day-to-day transaction entry and make that the default. That saves at least one click every time you open this window.
Human Resources (HR)
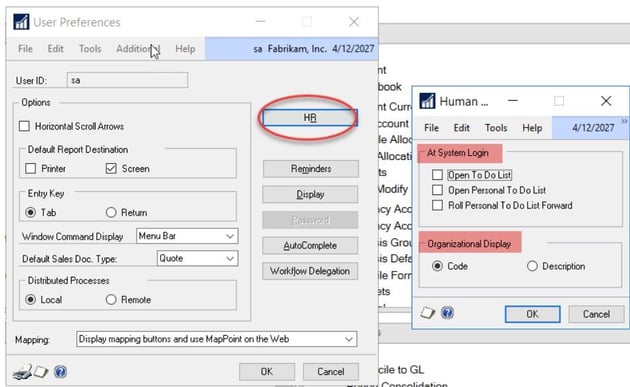
There's an HR button in User Preferences for setting what’s available to you when you log in. If you have access to the HR module, you have the following options upon system login:
- Open a To-Do List
- Open Personal To-Do List
- Roll Personal to To-Do List Forward
Here, you can also change your Organizational Display. If you have categories displayed as Codes but your departments are numbered and you don't know every code, you can change this display to Description, so you see the description instead of a code.
Quick Links
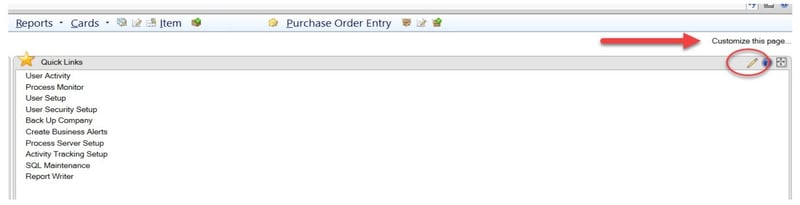
Instead of having to navigate through multiple levels of Tool Bars, Quick Links gives you direct links to Microsoft Dynamics GP windows Web Pages and external files or programs – all in one spot.
From your Home Page, go to Customize This Page and select or deselect items you want to see on your Home Page. You can also hover over the Quick Links pane, select the pencil icon in the top right corner, then click the Add button to add new links. From this window, you can also modify the name of your link and change the order in which all links appear on the Home Page.
You can also choose whether you want your home page to lay out in one, two or three columns, and how you want the columns to stack.
To add Quick Links, you can either click on Customize this Page OR hover over the Quick Links pane, select the pencil icon in the top right corner of the pane, and then click the Add button to add new links.
If you want to add a Microsoft Dynamics GP window, click Add GP Window and select the window you want a Quick Link for. Once it populates to the bottom of the list, you can move it where you want it located. Then, select Okay. To see the new Quick Link, you can force a refresh by selecting the arrows at the top right to refresh your screen.
You can also create Quick Links for:
- A GP navigation list
- A web page
- A file, such as an Excel spreadsheet

Other Home Page Tips
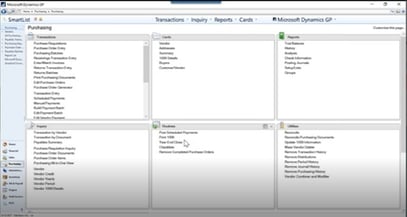
For every module, the Navigation Pane has the same seven boxes. There are six action areas and Setup. You may not have access to all of them due to security. You can make the action areas you use most larger on your screen to easily see your options.
 ------->
You can also make Reports dynamic, meaning nothing that changes is hard-coded, so you’re not forced to go through several screens each time. Say you want to be able to look at a Summary Trial Balance or AP Aging. You want to run it on the previous period. When you’re doing the setup, choose all parameters, but for the date field be sure to choose any options except for Enter Date (i.e. choose previous period, previous year, etc.). Once you have it how you want it, click on My Reports, give it a name and hit Save. Now, when you go back to the Home Page, your report is there. When you click on it, it automatically populates the report with your saved parameters. That’s one click as opposed to six or seven!
SmartLists
SmartLists are a great tool for getting ad-hoc information out of Microsoft Dynamics GP. You give the SmartList parameters, and it gives you results. The data populates with information on one line per document. It makes it easy to export any SmartList to Excel with one click and do any slicing and dicing you need.

You’ll notice that SmartLists that come out of the box with GP have an asterisk next to them. You can also save favorites, so you don’t have to reinvent the wheel and define your search parameters every time.
Importantly, with SmartLists, you can:
- Find data from sub-ledgers on financial transactional SmartLists
- Quickly check for Account Posting Types prior to Year-end Close
- Find a specific dollar amount to troubleshoot problems
How Do I Use SmartLists?
- Expand the Module folder and the Options folder to see default SmartLists.
- Shut off Auto-hide for the Navigation Pane. The Navigation Pane seems to disappear, but in the top left next to the blue bar there is a “greater than” sign you can click to see the pane. If you don’t want it to disappear when you open a SmartList, go to your SmartList options, select the Favorites Pane and turn off Enable Auto Hide.
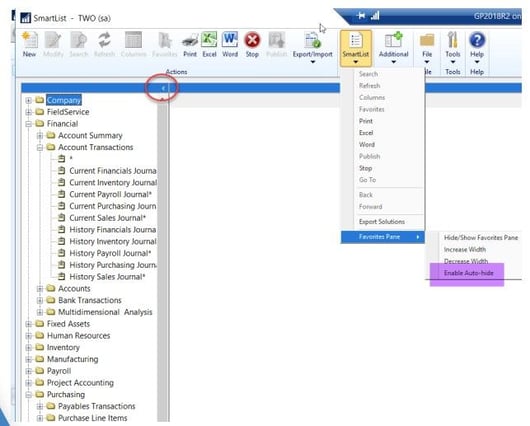
- Start with a * SmartList and build off that. It helps to start with an asterisked report, starting with the basics and adding or removing as needed. For example, if you’re looking for transactional information in the General Ledger, go to Financial Account Transactions, where you can build off existing information.
Add Columns
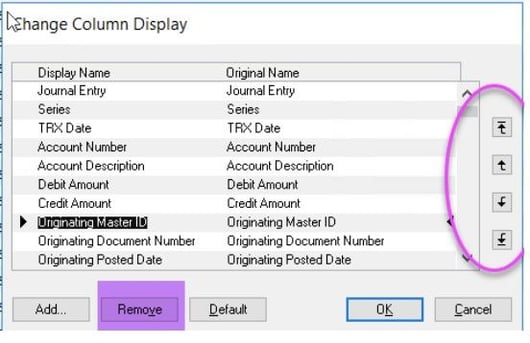
You can add columns by clicking Columns in the top ribbon and hitting the Add button. Then click on the column that you want to add and it will populate at the bottom. You can move it up and down using the arrows.
If there’s a column you don’t need, click on it and hit the Remove key.
You’ll notice there is a display name and original name. When you set it up, keep in mind you can change the display name here.
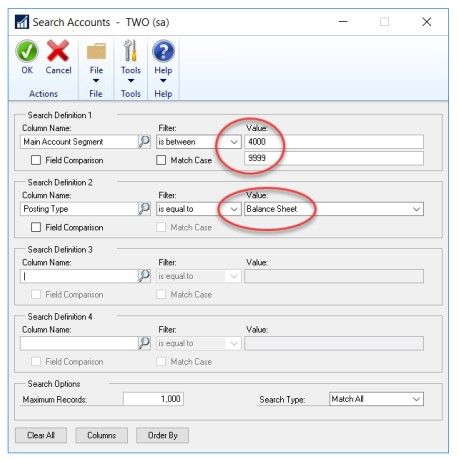
Select Search Parameters
If you want to search, say for a particular date, you have four search parameters you can input selections into. Let’s say you use transaction date. You can use the filters, such as ‘contains’, ‘equal to’, ‘begins with’, ‘is between’, etc. Say you want all transactions between two dates. Select those dates. Select Okay and it will come back with documents within the transaction dates.
Save SmartList
To save your SmartList, go to Favorites. This equates to Save. Give it a name other than the asterisk. You can make the SmartList visible to your system, to just a company, a particular User Class or User ID (typically yourself). Once you make the selection, select Add Favorite, and it will show up as a custom report without an asterisk.
If you make a change and want to save your changes, you would go back up to Favorites, select Modify and it will save the changes, similar to Save As.
*See further demonstration details in the webinar below.
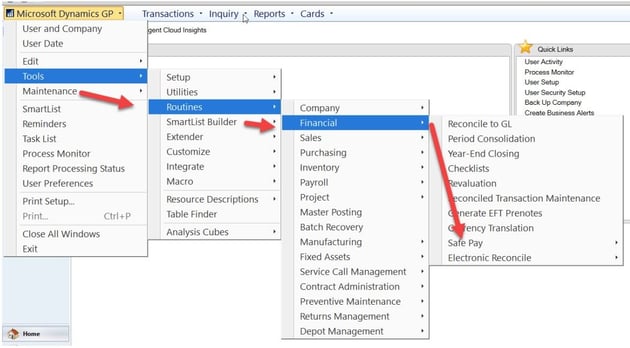
A Tool to Reconcile Sub-ledgers to the General Ledger
You can use the Reconcile to GL tool to balance back to your sub-ledgers. If you are running later versions of Microsoft Dynamics GP (such as 16 or 18) it is available to be used for Payables, Receivables, Inventory and Cash. In prior versions of GP only Purchasing and Receivables are available.
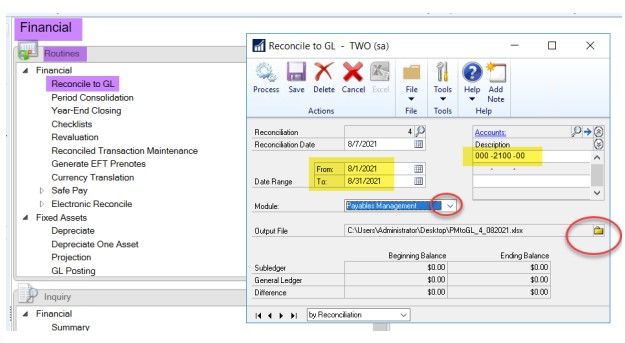
The Reconcile to GL tool is in the Financial module under Routines. The reconciliation date defaults to the system date. For example, if you want to look for an August “out of balance” in the Payables module. Choose Payables Management as your module and populate the Account Number. Then enter August dates and select an output destination for the file. If it prompts you that you're missing something, it's usually the output file.
When you select Process, it opens an Excel file and the top section gives you Unmatched Transactions. Nine times out of 10, this is the only place you'll need to look. The left-hand side will always have the sub-ledger, whether it's payable, sales, cash, etc. The right-hand side will have the General Ledger.
If something's showing up under Unmatched Transactions, there is some drill down capability here where you see a blue number. Go into the actual document in Inquiry and try to map out the progression of the transaction to determine why it is unmatched. Remember this is only a tool to assist with balancing.
Say there's a lot of things on the sub-ledger that never hit the General Ledger. Go into your sub-ledger and try to find out why these didn't hit the General Ledger. If you think they should have and they didn't, you will need to create a journal entry to get them into the General Ledger.
If you've gone through all the Unmatched and resolved those and you're still out of balance, look at the Potentially Matched. Normally these are transactions GP thinks probably match up but could be a clue to your out balances as well.
Microsoft Dynamics GP Tips Including Customization, Running Reports and Working in the Financial Module
There is still more to cover! In this second half of this article you’ll learn how to:
- Customize lookups and sorts
- Run reports more efficiently
- Use a nifty shortcut for customer refunds
- Streamline processes in the Finance module
- Shut off unneeded reports in Administration module
Customize lookups and sorts in Microsoft Dynamics GP
As with any Microsoft product, Dynamics GP offers multiple ways to perform just about any given task. This means that if a task feels a bit arduous, there’s probably an easier way to do it—you just need to know how. In the Purchasing and Sales modules, you can customize lookups and sorts to fit your needs.
Microsoft Dynamics GP Sales and Purchasing Module Lookup Views
When you look up a vendor name in the Purchasing module, you may find that the vendor lookup window view is always set to “vendor ID,” and that you have to click on the header to switch the view to “vendor name.”
You can save a click (and a lot of clicks over time) by selecting the “Vendor Name” view, clicking the dropdown triangle on the left, and clicking “Set as Default View.” 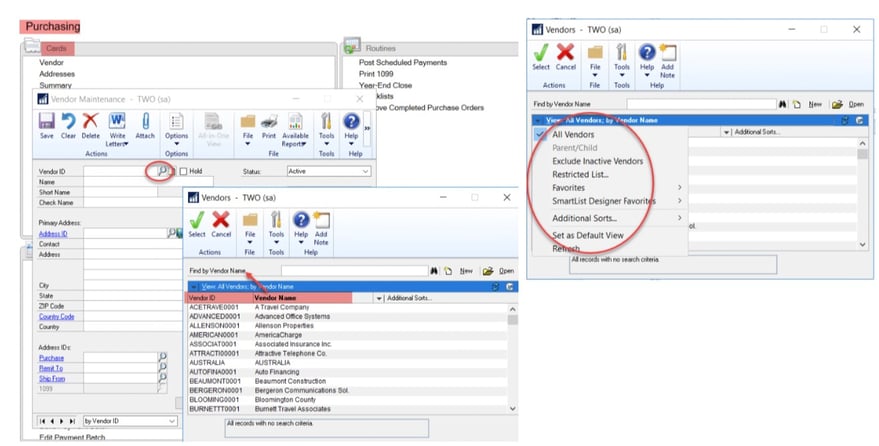
You may also find that your vendor list has a lot of inactive vendors on it, which can make it hard to focus on your active vendors. Simply choose “Exclude Inactive Vendors” from the drop down, and then click “Set as Default View.” 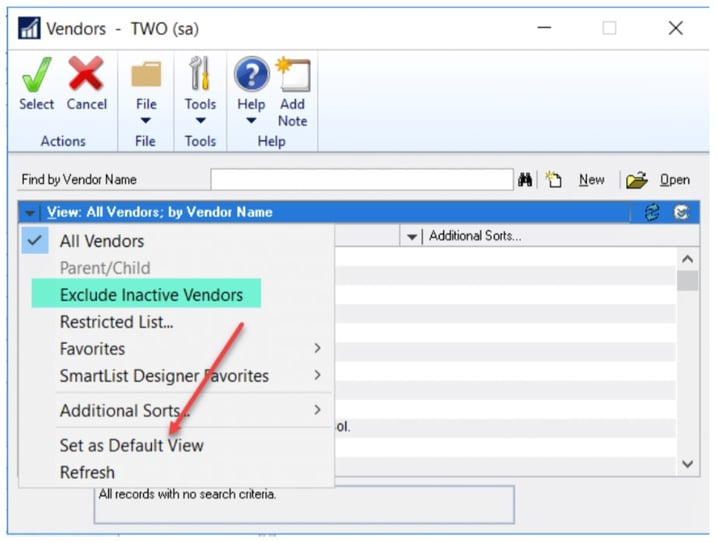
You can use the same approach to customize your customer lookup view in the Sales module. Try experimenting with different views to find which one works best for you, and then set that view as your default.
Custom sorts in Dynamics GP
When performing a vendor or customer lookup, you may want to sort your list by one or more specific parameters. You can do this by clicking the “Additional Sorts” column header and choosing “by Custom Sort.”
Then, scroll through the list of Available Columns to find the column you’d like to search by. Select your preferred column, click “Insert,” and when you’re done, click “OK.”
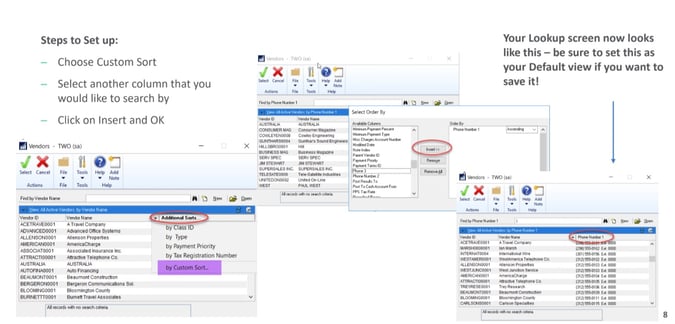
If you find this new sort to be useful, make sure to set it as your default view!
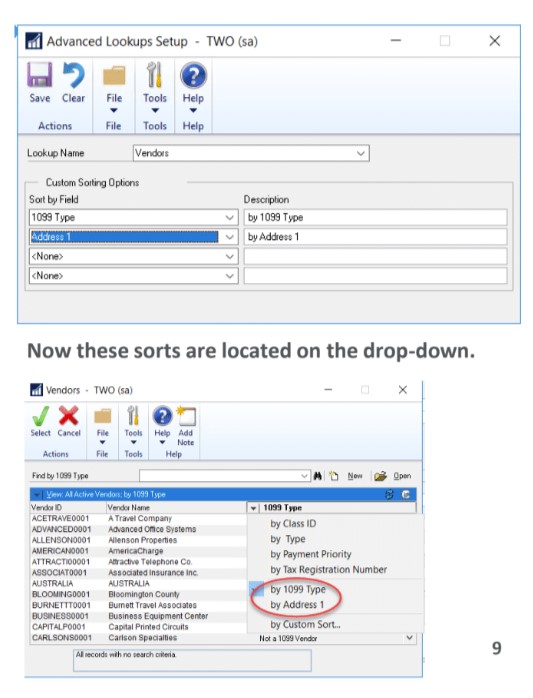
Advanced sorts in Dynamics GP
If you need to get even more granular, you can set up an advanced sort. To do this, go to the Administration area on the lefthand navigation, then to Setup, and select “Advanced Lookups.”
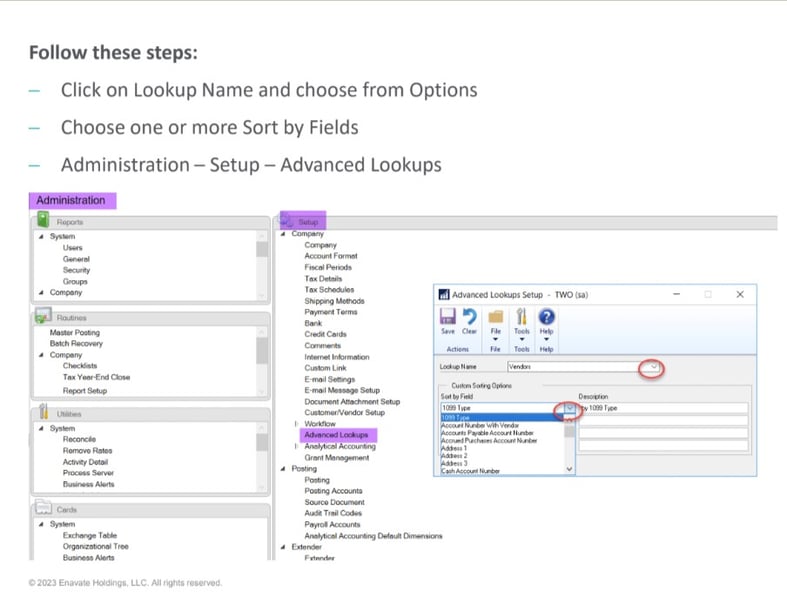
Choose a lookup name from the dropdown and scroll through the fields to find the categories you’d like to sort by. Then, click “Save.” These sorts will now be in the dropdown menu when you perform a lookup.
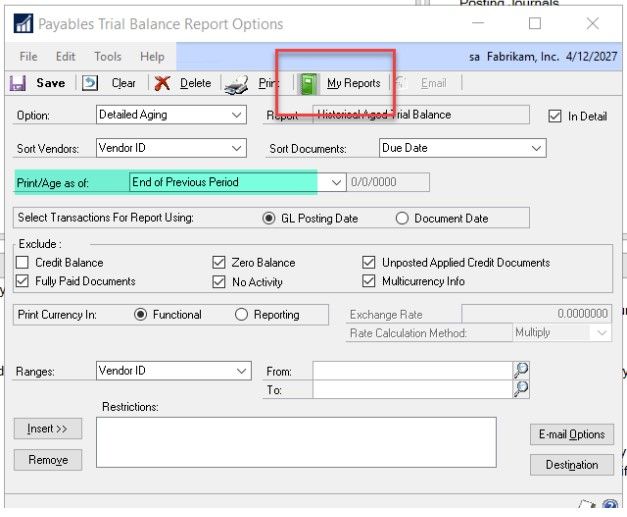
Run Reports More Efficiently in Dynamics GP
If you find yourself changing the parameters every time you run a report, you may benefit from saving your filters. This can turn reporting into a two-click process, rather than one that takes five or six clicks.
Start by going to the Reports menu at the top of your Dynamics GP screen and selecting the type of report you’d like to save a filter for. In this example, we’ll go to “Sales” and then “Trial Balance.”
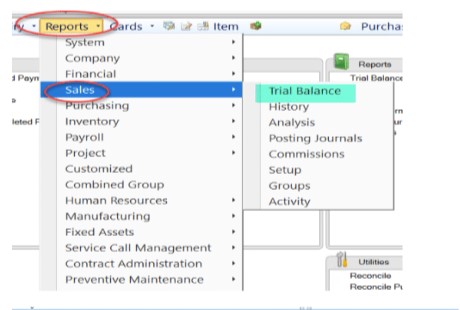
Then, select a subtype of report. In this example, we’ll go with “Historical Aged Trial Balance.”
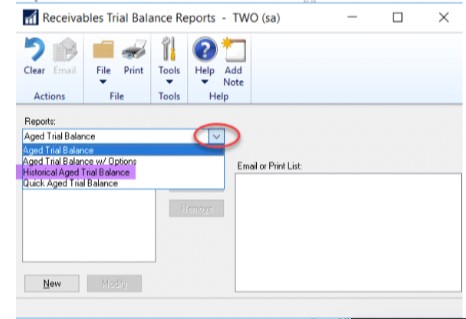
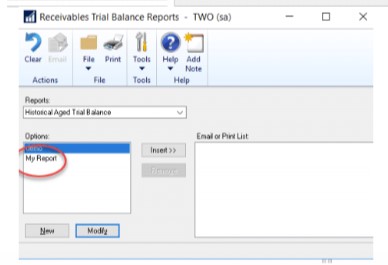
If you already have an existing filter option, select it in the “Options” list and click “Modify.” If you’re creating a new filter from scratch, click “New.”
In the new window, you can set sorting options, exclusions, ranges and other parameters. When you’re done, click “Save.”
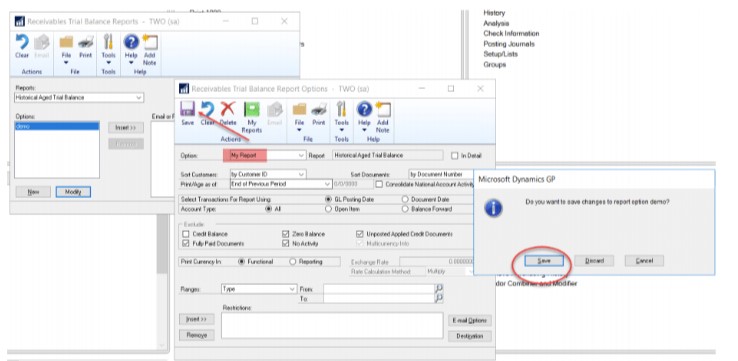
Select your filter option from the list, click “Insert,” and then you can click “Print” to print the report with your filters in place.
Because you’ve saved your filters, the next time you run a report, you’ll be able to do it much faster!
Find report figures quickly in Dynamics GP
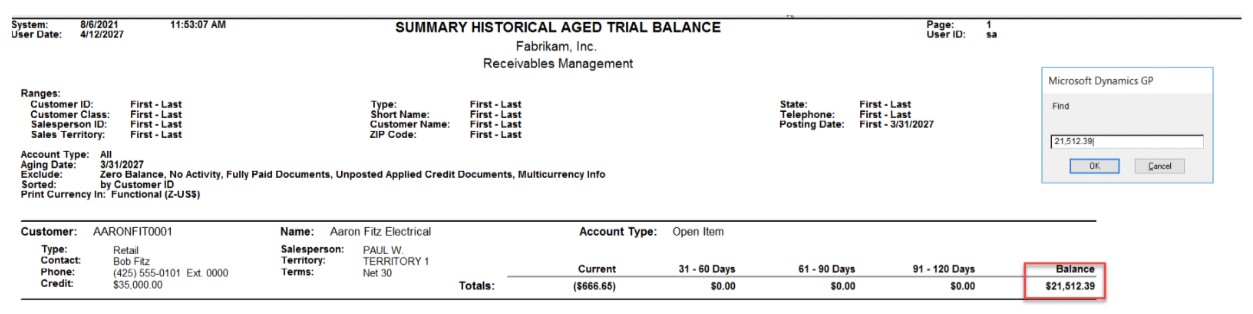
Another way to save time when dealing with reports is to use the “Find” feature. It works the same way it does in any other Microsoft product. Once you’ve printed your report to the screen, simply hit Control + F on your keyboard to bring up the Find window.
Then, type what you’re looking for into the field, and click “OK.”
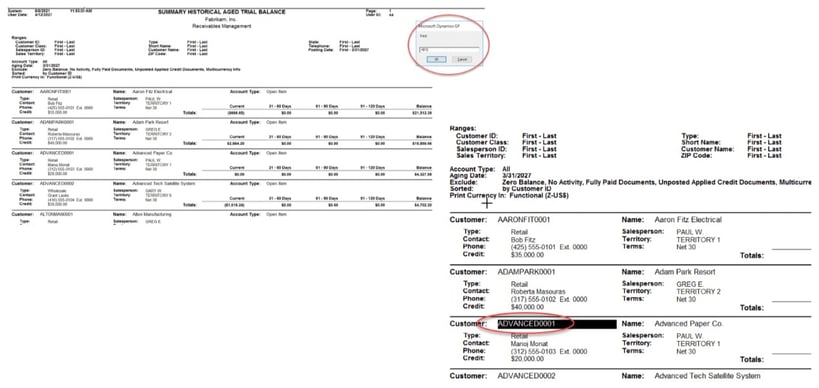
You can use this to search for specific customer names or numbers. Just be sure to include any commas and decimals.
Use This Nifty Shortcut for Customer Refunds in Dynamics GP
If you need to cut a customer a refund check because they overpaid, or for any other reason, you can use this shortcut.
First, go to “Sales,” find the Setup window, and select “Refund Checks.” In the new window, choose a “Default Suspense Account” or create a new one—just know that you’ll need to check this account at the end of the month to make sure it’s at zero.
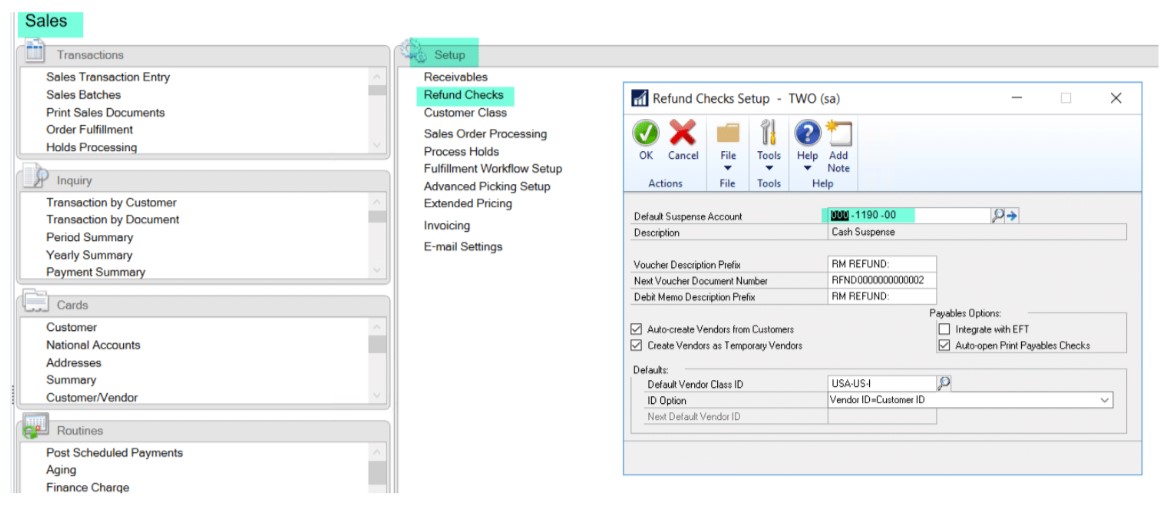
This is necessary because the receivable side of the transaction will hit the suspense account with the refund, and then the AP side of the transaction will clear the suspense account, effectively washing the transaction through it.
When you’re setting up the account, add the necessary description information. We also recommend checking “Auto-create Vendors from Customer” and “Create Vendors as Temporary Vendors.” This will take your existing customer card info and create a vendor card for the transaction, and because you probably won’t use that customer as a vendor very often, it’ll ensure that the customer doesn’t get added to your vendor list permanently.
We also suggest checking “Auto-open Print Payables Checks” to save you a click once it’s time to print the payment.
Once you’ve completed this one-time setup step and you need to cut a refund check, go to “Sales,” then Transactions, and then select “Refund Checks.”
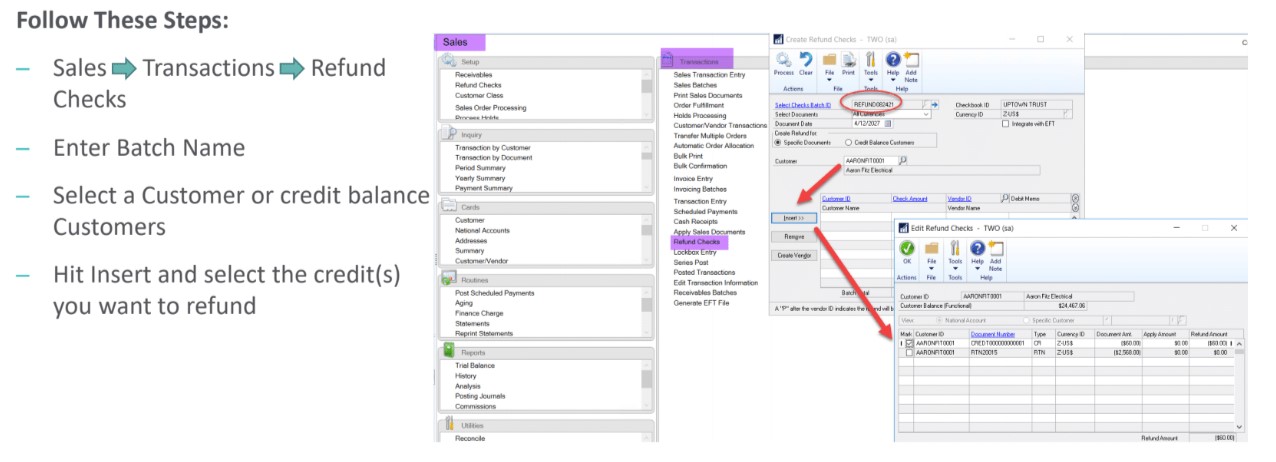
In the new window:
- Enter the “Batch” name
- Select a Customer or credit balance Customers
- Hit “Insert” and select the credit(s) you want to refund
Now, if GP doesn’t find a corresponding AP Vendor for the transaction, hit “Create Vendor” to automatically create an Active or Temporary Vendor.
Then, just click the “Process” button and hit “Transfer” to make the transaction.
Because you selected “Auto-open Print Payables Checks,” the “Print Payments” window will pop up on its own. Click the “Edit List” button to confirm the check totals, and when you’re ready, click “Print.”

Streamline Processes in the Dynamics GP Finance Module
You can make several processes in the Finance module more efficient with just a bit of setup, including:
- Correcting journal entries
- Checkbook balance inquiries
- Control accounts
- Date creation
- Account Rollup Inquiry screen
If you frequently perform any of these tasks, you could save lots of time by shortening the process involved.
Correcting journal entries in Dynamics GP
As you may already know, when you post a journal entry in GP, it cannot be voided directly. So, what do you do when you need to correct a journal entry that’s already been posted?
One way to do this is to create a new journal entry and fill it out with the corrected information. Another is to copy the relevant entry and correct the necessary fields. Or, you could just have GP create a correcting entry for you.
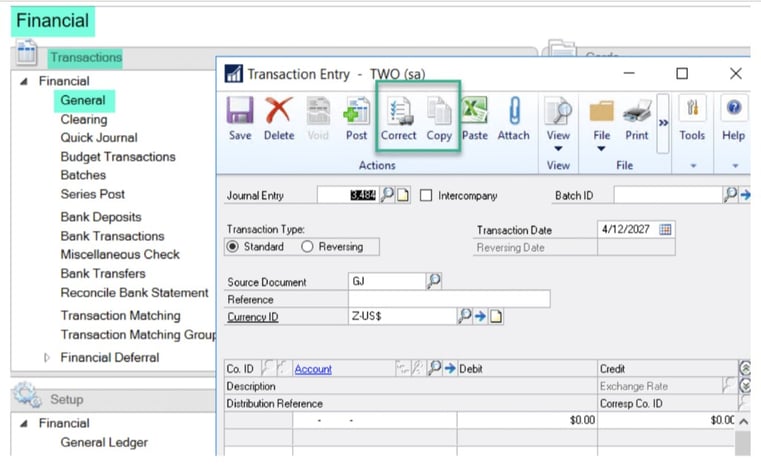
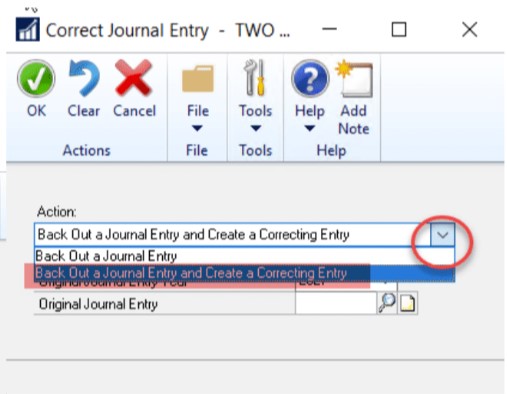
To do that, start by clicking “Correct.” In the new window, select either “Back Out” or “Back Out and Correct.”
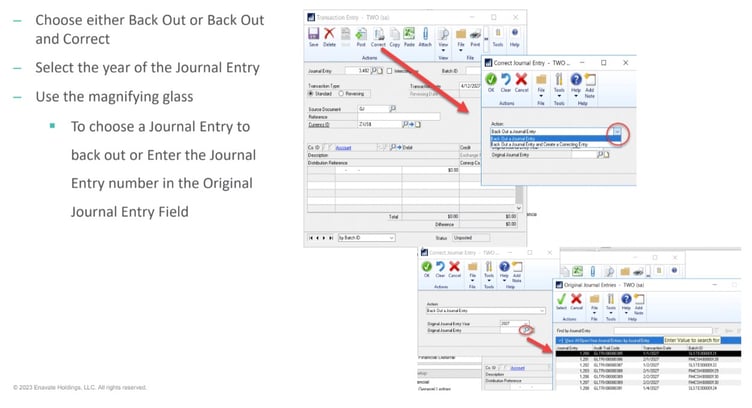
Next, select the Original Journal Entry year from the dropdown.
Then, you can click the magnifying glass to find the specific journal entry you’d like to back out, or if you already know the journal entry number, you can just enter it in that field. Then, hit “OK.”
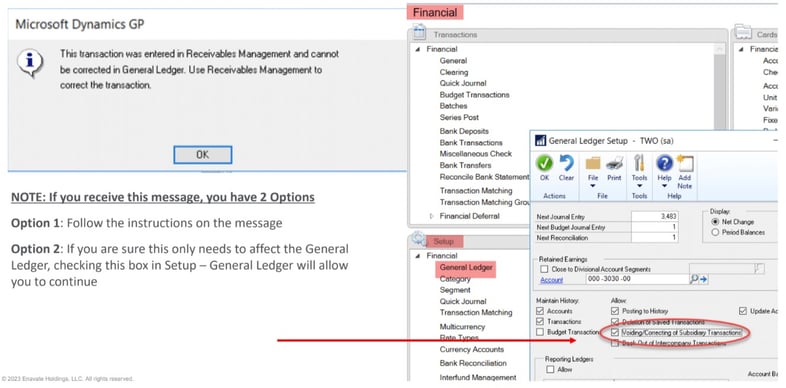
You may get a message that looks like this:
From here, you have two options:
- Follow the instructions in the message, or
- Go to Setup, select “General Ledger,” and check “Voiding/Correcting of Subsidiary Transactions.” Do this only if you’re sure that the journal entry correction just needs to affect the General Ledger. We recommend not leaving that box checked since it could throw your Sub-Ledger and General Ledger out of balance in future corrections.
When you’ve done one of those two things, you’ll get this message:
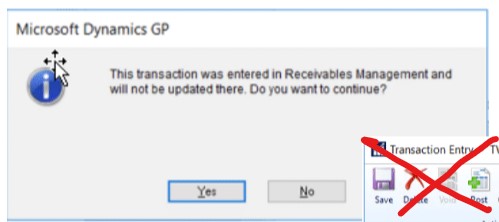
Hit “Yes” to continue.
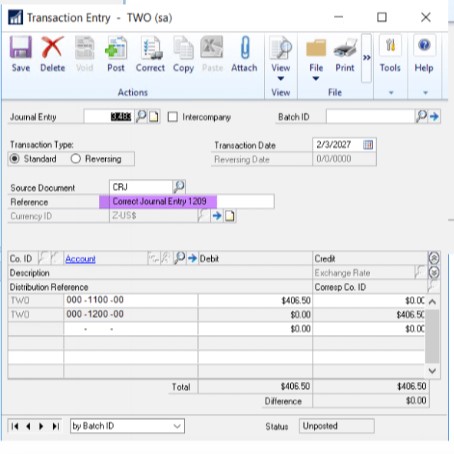
Now you can select “Back Out a Journal Entry and Create a Correcting Entry.”
And in the window that opens, you can change the transaction date and references, use the expansion buttons to put a note on the distribution lines, save it to a batch (if desired), and post the correcting entry.
Checkbook balance inquiry in Dynamics GP
If you need to make a checkbook balance inquiry (under either “Checkbook Register” or “Checkbook Balance”), make sure you choose the dates before you choose the checkbook ID. If you choose the checkbook ID first, it will not allow you to choose dates, and it will populate every transaction from the beginning of time.
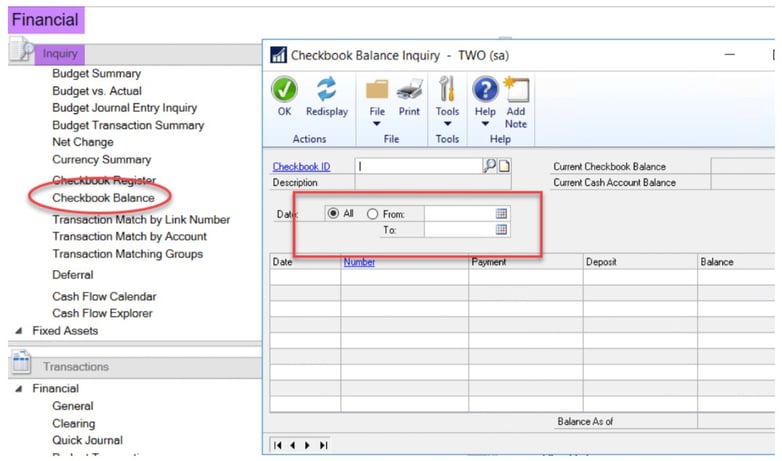
Depending on how long your company has been making transactions, it could take a long time to populate—a decade’s worth of transactions could take half an hour or more.
Control accounts
Control accounts are accounts that you balance your sub-ledgers to in Dynamics GP, such as your AP account, your cash accounts, accounts receivable or sometimes your inventory. As GAAP-compliant software, GP does a good job of keeping your sub-ledgers balanced to your general ledger most of the time. However, if you’re having issues, you may want to consider shutting off account entry to the control accounts.
To do this, bring up the account in Account Maintenance and uncheck “Allow Account Entry.”
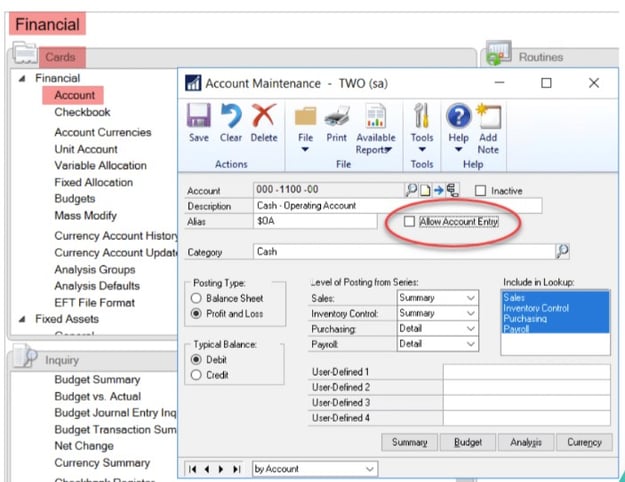
This will prevent users from posting any general journal entries directly into a control account. In most cases, if you’re posting to payables, receivables or cash, you don’t want to post a general journal entry, because it will throw your general ledger and sub-ledger out of balance.
Once account entry has been turned off, any user who tries to post a journal entry to one of those accounts will get this message: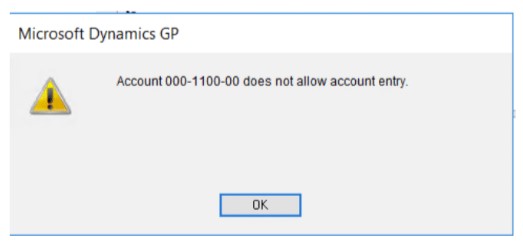
If you need to enable journal entry for any reason, simply go back into Account Maintenance and check “Allow Account Entry.”
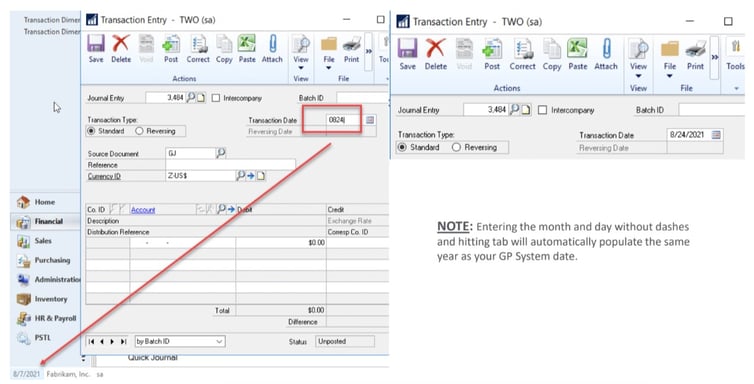
Date Creation in Dynamics GP
When entering a date in GP, save a few clicks by avoiding the calendar.
In any transaction date field, key in the first four digits from the date, and GP will automatically populate the year based on the system date.
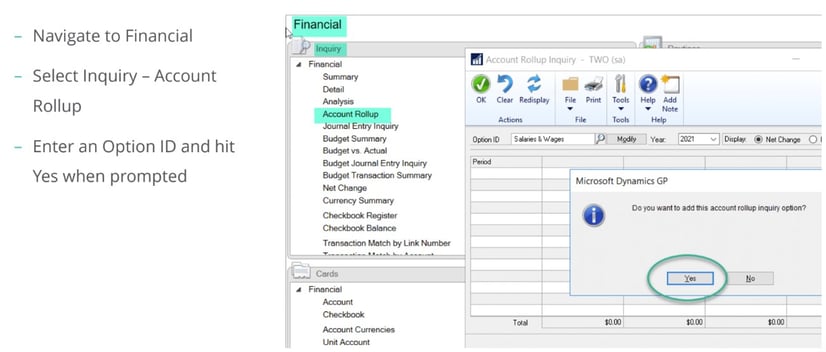
Account rollup inquiry in Dynamics GP
If all your main account segments are the same across divisions or departments, you can really get a lot of value out of an Account Rollup Inquiry.
To perform an account rollup inquiry, navigate to the Financial module, select “Inquiry,” and click “Account Rollup.” Then, enter an Option ID and click “Yes.”
In the Account Rollup Inquiry Options window, you can have up to four column headings to sort by. In this example, we chose Actuals, Budget, and Variance.
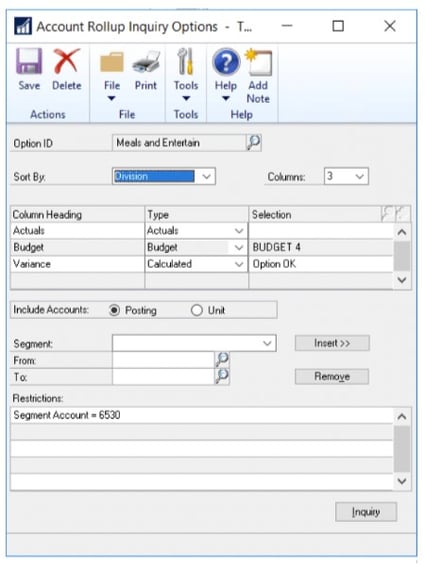
For Budget, choose a budget from the dropdown menu under the “Type” header.
For Variance, you can choose a “Calculated” type. This brings up a blue arrow next to the headers. Click the blue arrow to bring up the Account Rollup Inquiry Calculated Column window.
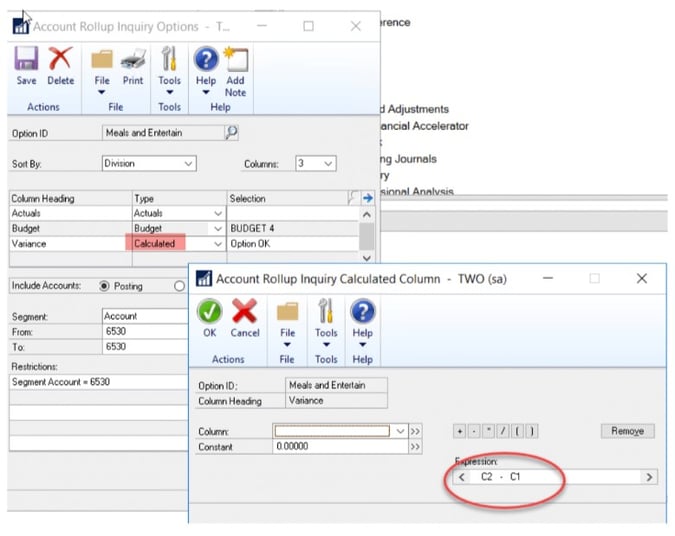
In this window, you can choose a calculation expression for the Variance column. In this example, we wanted Budget minus Actuals, so we expressed it by choosing C2 (the Budget column) minus C1 (the Actuals column).
After setting your calculation, hit “OK.” If GP doesn’t accept the expression, you’ll have to return to the window to fix it.
When your third column calculation is working, you can change your column headings and choose which accounts to include. In this account, we chose a Posting account (rather than a Unit account) and the account segment (6530). When you’re ready, hit “Save.”
In the next screen, you’ll notice that the headers are now blue hyperlinks.
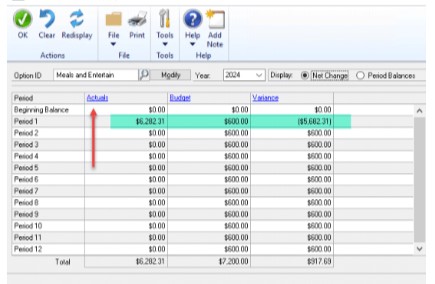
Click a hyperlink to drill down and find more information. In this example, we’ll click on “Actuals.”
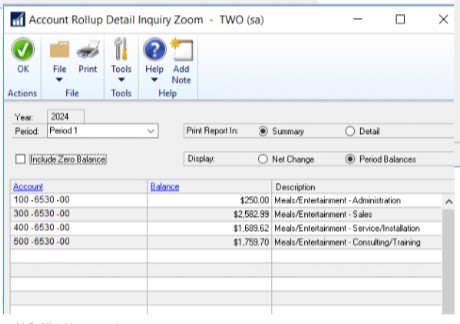
We have four divisions for this main account, broken down by the balance of each division. These add up to the Actuals total.
You can also look at period balance instead of net change:
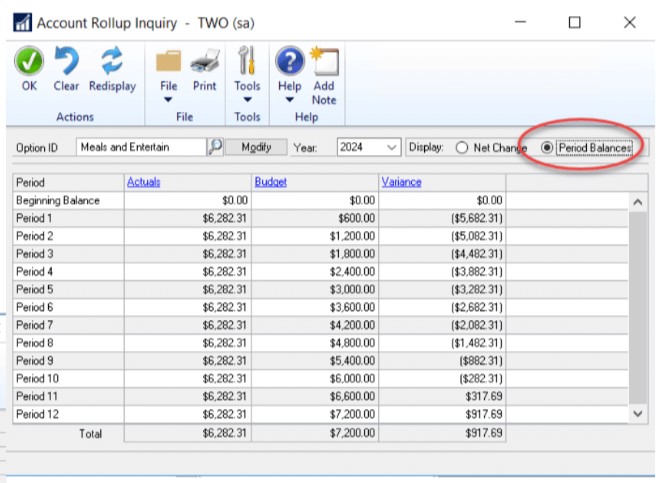
This gives you a running balance like if you were to look at a summary inquiry for a particular account. The difference is that you’re looking at all the accounts that have the same main account number.
Another way to use this is if you have (for example) multiple salary accounts, but they’re separated by division or department. By performing an account rollup inquiry, you can look at the whole range of accounts rather than just one of them.
Administration Module Tips in Dynamics GP
Close individual tasks in Dynamics GP Administration Module
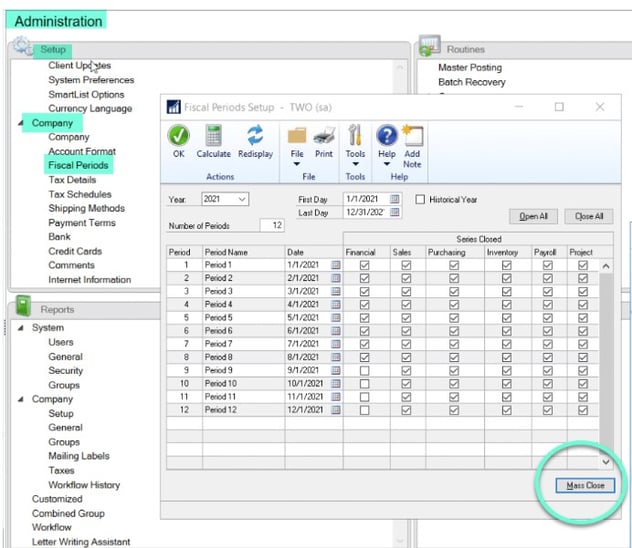
Sometimes you’ll want to close an individual task without having to close the entire module. For example, you may want to do a soft fiscal period close rather than a hard year-end close.
To do this, go to the Administration module. From there, select Setup -> Company -> Fiscal Periods.
If you’re responsible for producing month-end general ledger reports and you’ve already published them, you don’t want anybody posting into that fiscal period. Prevent this by checking the box under the relevant series.
When you’ve closed off your chosen modules, click the “Mass Close” button. It sounds a little scary, but don’t worry: All it does is let you see different transaction options that you can keep open if you want everything in a particular module closed.
In this example, we’ll close everything except for general journal entries.
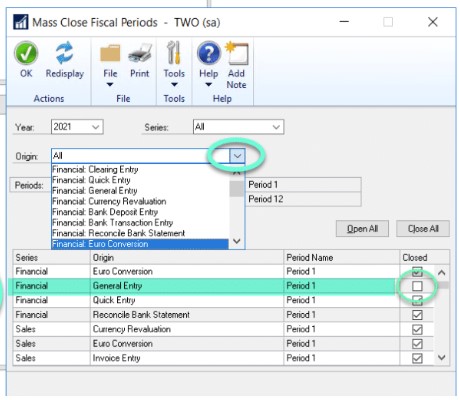
Feel free to click around to get a feel for what shutting off certain options will do. Just make sure you don’t shut off anything that your users will still need to post into.
Print screens in Dynamics GP
Let’s say you’re printing a transaction entry report. You hit “Post” on the batch and 10 print windows pop up. Now you must hit “Cancel” 10 times. A bit frustrating, right?
You can prevent those print boxes from populating and save yourself some clicks. Just go to the Administration window, click on “Setup,” and then elect “Posting > Posting.”
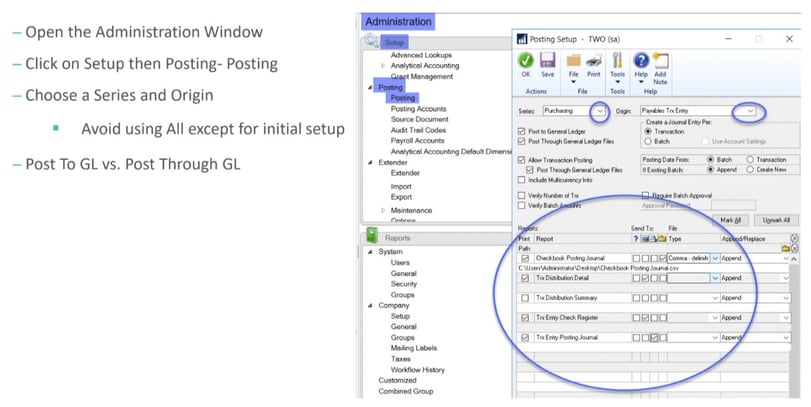
Next, choose a Series and an Origin. (Avoid using “All” except for when you’re doing initial setup.)
Under that, check both “Post to General Ledger” and “Post Through General Ledger Files.” This allows you to make changes without breaking your audit trail.
If you don’t want to post through General Ledger files, check “Require Batch Approval” and set an approval password. This will help everything stay in sync.
We also recommend unchecking “Allow Transaction Posting.” Otherwise, you won’t be able to post directly without creating a batch.
Under Reports, you can choose where to send each report. Some reports, you’ll only want to send to a file, while others you may want to print. By setting up your report print types, you’ll avoid having to click out of a bunch of windows every time you print.
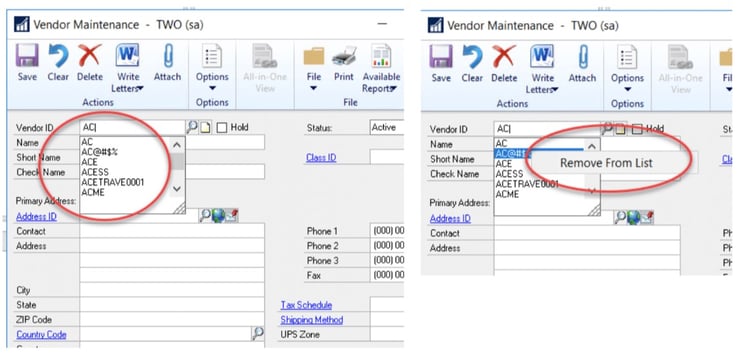
Bonus tip: Clean-up Auto-Complete Suggestions in Dynamics GP
If you’ve been using GP for a while, you probably have lots of auto-complete suggestions in your various fields. However, not all those suggestions will stay relevant forever. If you want to pare down your auto-complete suggestions to make the relevant ones more accessible, just go to Maintenance for the field you want to streamline, select the ID you want to remove from the dropdown list, and hit “Remove From List.”
Simplify Microsoft Dynamics GP Functionalities
There may be several ways to perform the same function in Microsoft Dynamics GP, but some ways are easier than others. Save yourself time by customizing settings to fit your preferences and workflow.
If you are interested in learning more about how to leverage Microsoft Dynamics GP for your year-end task list, be sure to check out our webinar, Dynamics GP Year End Close Process Webinar.
Any further questions? Reach out to one of our Enavate experts.