Year-end close can be scary, but it doesn't need to be! At Enavate, we focus on helping organizations create an efficient, streamlined Dynamics GP year-end close process that reduces stress and keeps your team on track. In this guide, we’re sharing practical tips and best practices to help Microsoft Dynamics GP users work more efficiently and close the year with confidence.
Keep reading and you’ll learn:
- Where to start your Dynamics GP year-end close process
- Each step in the GP year-end close process
- How to prepare for next year
How to Close the Year in Dynamics GP
The recommended Dynamics GP year-end close sequence is:
- Sales Order Processing (SOP)
- Purchase Order Processing (POP)
- Inventory
- Receivables Management (AR)
- Payables Management (AP)
- Fixed Assets
- Analytical Accounting
- General Ledger
Always complete SQL backups before each module close and ensure all users are out of the system.
If you’d rather, you can watch the webinar outlining the tips and tricks here:

Dynamics GP Year-End Close Checklist
The key to a successful year-end close is to focus on what each step accomplishes and be prepared for the entire process. Make sure that you have backups of each GP database in SQL and then determine what modules you need to close.
Pre-Close Checklist
- Install year-end updates
- Reconcile subledgers
- Complete backups
- Verify posting settings
- Restrict user access
- Run test close
How to prepare for Dynamics GP Year-End Close in the Purchasing Module
To ensure you’re prepared. and everything runs smoothly during your audit, take the following steps.
Step 1: Run the Received Not Invoiced Report
This is found under Purchasing > Reports > Analysis > Received Not Invoiced Report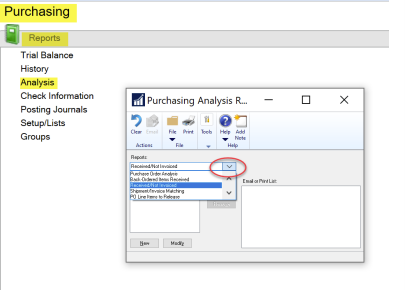
Step 2: Compare the total to the Accrued Purchases GL Account Balance.
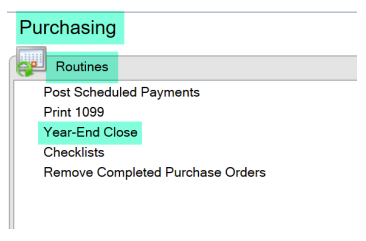
Step 3 (Optional): Remove completed Purchase Orders.
You can do this by going to Purchasing > Routines > Remove Completed Purchase Orders
This can help your system run quicker if you process many Purchase Orders.
Payable Year-End Close
Closing the Payables Module is not required.
Timing is important if you choose to run the year-end close process in the Purchasing module. You can’t POST any Payables transactions into the new year prior to closing the module if you want to depend on any YTD columns in SmartLists. However, you can enter transactions into batches and wait to post until after you’ve run the close process.
NOTE: If you process 1099s in GP, you do NOT need to close the Payables Module to do so. Keep in mind that YTD and LYR columns in 1099 SmartLists may not be accurate if you posted into the new year before closing the old year.
We recommend you use the print 1099 edit lists to check your annual amounts and generate your 1099s.
If you’ve posted AP Transaction into the new year before closing, Enavate can assist you with running SQL scripts to recalculate the YTD balances. Just open a support case via email at Support@Enavate.com or our portal https://enavate.microsoftcrmportals.com/ for assistance.
If you do wish to close the Purchasing Module:
Navigate to Purchasing > Routines > Year-End Close > Close Year
Prepare and Close the Sales Module
Sales Order Processing (Optional)
Sales > Utilities > Reconcile – Remove Sales Documents
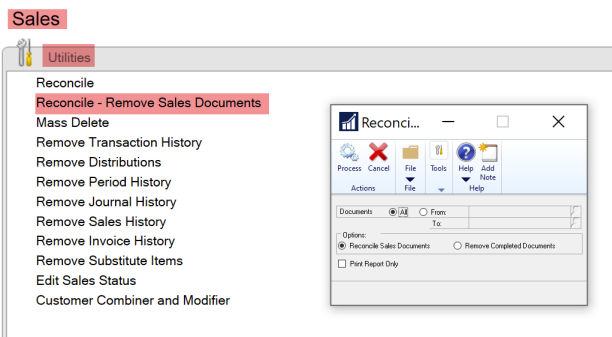
Most of the SOP Transactions move to history automatically. However, some may not, such as orders where only a portion was transferred, and the rest canceled.
Step 1: Run Remove Completed Documents to move these stragglers to history.
Step 2: Choose Print Report Only to see what documents will be affected prior to running the process.
NOTE: A SQL backup is highly recommended before running this process.
Sales Module Year-End Close
Navigate to Sales > Routines > Year-End Close > Close Year
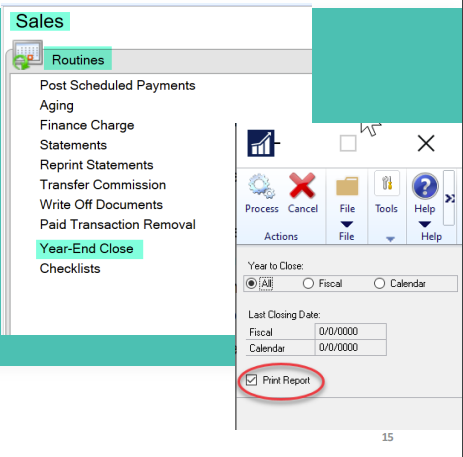
- Choose whether you want to close your Fiscal or Calendar year
- If you choose to print the report, be sure to print to PDF or file as this lists all activity for the year by Vendor
- Click on Close Year
Closing the Sales Module is NOT required. If you choose to close the Sales Module, Year-to-date balances are recalculated on some Inquiry windows and SmartList fields.
How to Prepare and Close Inventory Control in Dynamics GP
Before closing the Inventory Module or posting any Inventory Transactions into the new year, you’ll want to:
- Print the Inventory Stock Status Report
- Reconcile Inventory Quantities (Optional)
- Perform a Physical Inventory Count and post adjustments (Optional)
Inventory Year-End Close
- Navigate to Inventory > Routines > Year-End Close > Close Year
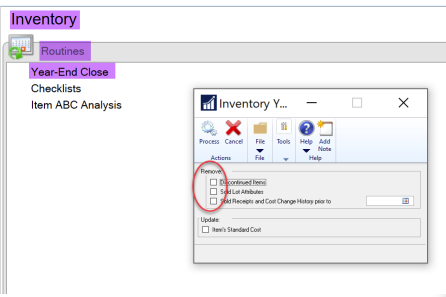
Closing a year transfers all summarized current-year quantities (cost and sales amounts) to transaction history for the items for which you’ve been keeping a summarized Sales History. The Quantity Sold field for each item is set to zero. These steps also update the amount in each item's Beginning Quantity field to the Quantity on Hand field at each site. You can also choose to update the Item’s Standard Cost by checking that box.
Prepare and Close Fixed Assets
It’s required to close the Fixed Assets Module prior to running depreciation in the first period of your new fiscal year calendar.
Step 1: Enter and post all transactions for the year, including Asset Additions, Changes, Transfers and Retirements.
Step 2: Be sure Depreciation is posted through the last day of the Fiscal Year.
Step 3: Create Fixed Asset GL transactions using the GL posting routine.
- Financial > Routines > Fixed Assets > GL Posting

When processing GL Posting for Fixed Assets
- DO NOT enter any Restrictions
- Review all entries listed
- GL Accounts CAN be changed in this window
- Clicking on Delete will only remove transactions from this screen
Step 4: Post GL batch.
To avoid having your GL differ from your FA Module, we recommend using the process button without any restrictions to populate the given section with anything that hasn’t been posted to the GL yet. After you have reviewed the results, you can then use restrictions to isolate entries that you do not want to post to the GL and save them in a separate batch.
Fixed Assets Year-End Close
Perform an SQL Backup before these steps:
Step 1: Navigate to Financial > Routines > Fixed Assets > Year-End
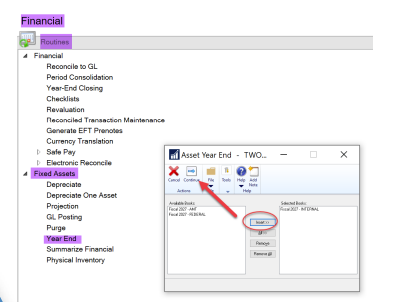
Step 2: Choose a book from the Available Books column then insert the book into the right-hand side of the window.
Step 3: Click on Continue.
Step 4: Print and Save the resulting report.
- Saving the resulting report will give you a definitive look at the status of assets at the end of your fiscal year.
- You can close multiple books at the same time, or if you prefer, you can close them one by one. GP will only allow you to close your books if your fixed asset calendar is built for the next year.
Prepare and Close General Ledger
Before finishing the Year-End process for your General Ledger, ensure the Accounts and Transaction boxes are checked ON under Maintain History.
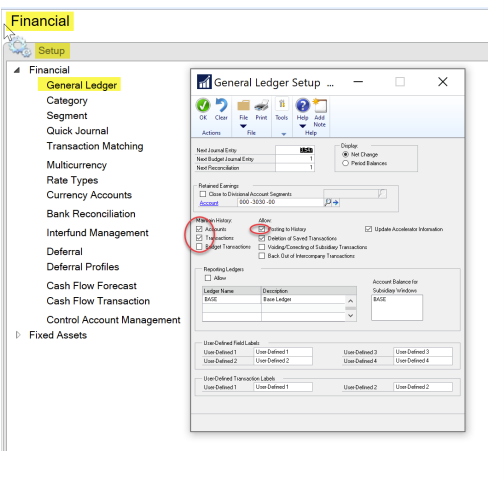
If you don’t maintain the history, you may not be able to access the fiscal year after it’s closed.
Allow Posting to History should also be checked.
Backups
Prior to closing the Financial module, arrange with your IT team to run full SQL backups on all company databases as well as the Microsoft Dynamics database. This is essential to ensure nothing is lost if failure occurs during the year-end Close process.
All users need to be logged out during the backup to make sure all data is captured during the backup. An optional backup is recommended after you close the year.
Check GL Account Posting Types
Account Posting Types determine how balances will roll forward into the new year.
They are found by navigating to Financial > Cards > Accounts
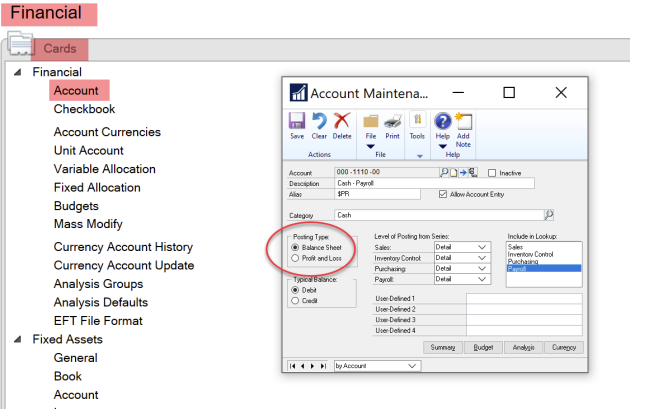
- Every account needs to have either a Balance Sheet or Profit and Loss Posting Type selected.
To check posting types you can, create two SmartLists— one for Balance Sheet Accounts and one for P&L Accounts. If all accounts are set to the correct Posting Type, then no results will be returned when you run the SmartLists. Once these SmartLists are created and saved as Favorites, they’ll’ remain in the system until they’e removed.
To learn more about setting up SmartLists, watch our first webinar on GP Tips and Tricks.
Unit accounts will show up with a Balance Sheet Type. Microsoft added a box in the Unit Account Card where you can choose to clear the balance after the year-end Close to avoid bringing a balance over into the new year.
Note: You’ll need to set up your new fiscal year prior to closing the General Ledger. To set up the new fiscal year, navigate to Administration > Company > Fiscal Periods.
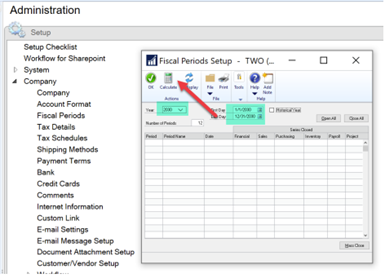
- Once the fiscal periods window is open it will default to the current year. To change this, just simply type over the current year with the new year.
- Enter the number of periods for that year and hit the Tab
- Click on Calculate – your Fiscal periods will now populate at the bottom of the screen.
- Update the Date column for each row if needed
- Period names can also be changed by typing over them with the desired title for the period.
Changes to Your GL Account Balances
Understanding what will happen when you finish your year-end Close for the General Ledger is important. All your GL account balances with the balance sheet posting type will roll forward into the new fiscal year, and all your GL account balances with a profit loss posting type will roll into Retained Earnings.
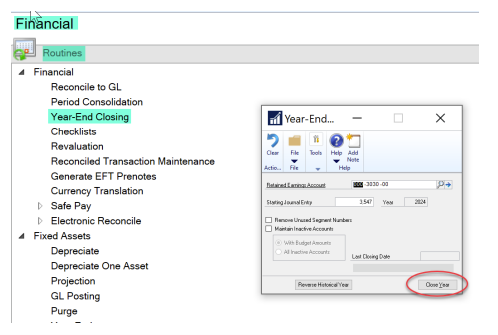
Dynamics GP Year-End Closing Options
Navigate to Financial > Routines > Year-End Closing

Here, you’ll see two checkboxes: Remove Unused Segment Numbers and Maintain Inactive Accounts. You don’t need to worry about the first of these options but Maintain Inactive Accounts should be addressed.
Maintain Inactive Accounts
- Specify how to handle inactive accounts with zero balances during the year-end close. If you want to keep inactive accounts with zero balances, mark this option and select which accounts to maintain.
- To delete all inactive accounts with zero balances, unmark Maintain Inactive Accounts.
With Budget Amounts
- Mark to keep only inactive accounts with zero balances that have budget amounts from being deleted during the year-end close process. Inactive accounts with zero balances and no budget amounts will be deleted.
- This option is available if you’ve marked the Maintain Inactive Accounts
All Inactive Accounts
- Mark to keep all inactive accounts from being deleted during the year-end close process.
Close the Year
Financial > Routines > Year-End Closing > Close Year
This can take anywhere from a few minutes to much longer. Remain patient through the process and do not force quit GP or SQL while this is running without contacting support first.
Lastly, print the resulting report to your screen to check to make sure the entry balances. If it does, be sure to print to PDF or to a file as this report cannot be reprinted. If the report does not balance, you will need to do some research to find out why – we can help! Email Support (support@enavate.com) or open a case from our portal.

General Best Practices for Dynamics GP Year-End Close
Here are some general best practices we recommend that don’t directly relate to year-end close processes in Dynamics GP.
- Reconcile Subledgers to your GL Accounts monthly
- Review Master Posting to ensure batches are posted prior to closing a period
- Close Fiscal periods promptly to avoid posting after monthly financials are published
- Ask IT about the current GP backup plan to ensure daily backups at a minimum are being performed
Maximizing Your GP Efforts
There are many different approaches to maximizing your GP efforts. You can always speak with your Account Manager about specific needs and develop the best path forward.
Upgrade
Upgrading to the latest version of Microsoft Dynamics GP gives you peace of mind knowing your investment is fully supported by Microsoft. This cost-effective option allows you to leverage the latest out-of-the-box reporting and smart analytics tools to make better decisions. We’ll help you build a path forward to maintain your current solution, enhance or customize your solution as your needs change or build a migration plan at your own pace.
In addition to the above, many third-party solutions can help you save time and money. Contact your Account Manager to learn more about all the available solutions that can enhance your GP effort.
If you’re considering an upgrade, contact your Account Manager or support@enavate.com for more information.
Dynamics GP Year-End Close FAQ
Q: Do you have to close the year in Dynamics GP?
A: No, but it is strongly recommended for reporting accuracy and audit readiness.
Q: How long does the Dynamics GP year-end close take?
A: Most organizations complete the process in 1–3 days depending on data volume.
Q: Can you reopen a year in Dynamics GP?
A: The General Ledger year cannot be reopened once closed.
Q: Do you need to close Payables before running 1099s?
A: No. Payables close is optional and 1099s can still be processed. (This is confirmed in Microsoft partner content.)
Q: What is the most important step in GP year-end?
A: Backups before each module close.
Q: Should you test year-end close first?
A: Yes — best practice is to run the process in a test company.
Originally published December 2022. Updated for relevancy and accuracy.