There are many reasons to create a modified Word form rather than a standard Word form in Microsoft Dynamics GP.
Some reasons include adding a logo to the form or adding additional fields to a report. Creating modified Word templates is much like creating standard Word templates (discussed in this recent blog) but with a few additional steps.
To begin, follow the same prerequisites that you would when creating a standard Word template in Dynamics GP, which includes installing the Word add-in from the Microsoft Dynamics GP Installation and turning on Developer Tools in Microsoft Office.
One of the major differences is that modified templates use modified reports in Report Writer, where the standard form pulls from the default report. If you have a modified report in Microsoft Dynamics GP, then when you select the type of Word form, you will select the modified form instead of the standard, or “simple” form, as seen in our post on creating standard Word templates.
Is the report modified?
The first step to modifying a Word template is to verify that the report you want to turn into a Word template has a modified version available. If security is set to the standard report, the report will need to be modified in GP; otherwise, when printed, the Word form will not include any of the modified fields.
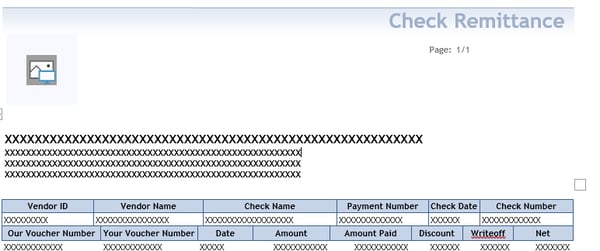
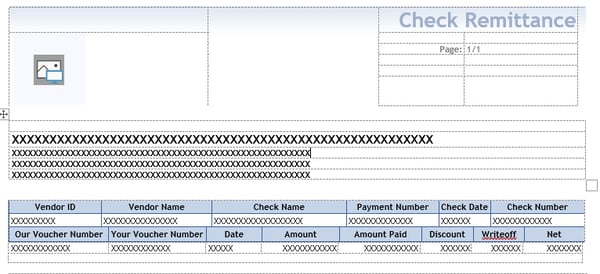
1. First, locate the report name by printing your report to screen, as seen in the screenshot below for a Check Remittance report. Once you locate the report name, you can access the security settings to see if you have modified the report and verify the correct setup for security.

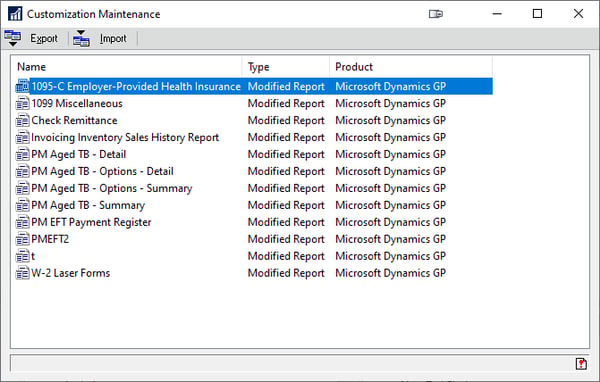
2. Another method to determine modified reports is to check the Customization Maintenance window. To access this, go to Tools>>Customize>>Customization Maintenance. If the report has a modification, it will display in the list; however, this does not indicate if the security is set up for users to print the modified report. Also, check the security in the Alternative/Modified Forms and Reports window.
To check the security, go to Tools>>Setup>>System>>Alternative/Modified Forms and Reports. Then select the report group assigned to your user(s), and then the product and report as the type. Locate your report and expand the window to see the selection. If it is set to Microsoft Dynamics GP, then it is set to the standard report. If there is no modified option, then the report is a standard report. Set the report to “modified” to apply any changes to the default report when you print your Word form.
Creating a modified Word form
After verifying that a modified report exists and that the security is set up, the next step is to create and then add the fields to the Word form.
1. First, add the fields to the modified report in Report Writer. If you haven’t modified the report previously, then you need to adjust the security settings on the report to tell Microsoft Dynamics GP to print the modified version and not the standard version of the report.
2. After adding the fields and checking that the security settings are accurate, print the report as an XML file. The XML format serves to generate the form with the additional fields and changes you want to see.
3. To print the XML, you will go through the process of generating the report in Microsoft Dynamics GP. Then in the selection panel you will select File and then define a path in the file name. First select a path, then define the file format as an XML Data file. The destination should look like the following screenshot:

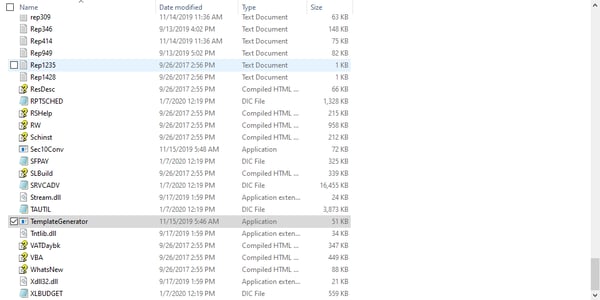
4. Fortunately, Microsoft has created an easy way to turn the XML into a Word form with minimal effort. First, navigate to your Microsoft Dynamics GP folder in Explorer. A typical path, which can vary depending on your version of Microsoft Dynamics GP, is C:\Program Files (x86)\Microsoft Dynamics\GP2018. The final folder will typically be the version that you are running. For example, if you are on GP2018, then the final folder will be GP2018. Once in this folder, locate the TemplateGenerator application.
5. Now, open a second Explorer window and navigate to your printed XML file. Put the two windows side by side, and then drag and drop your XML into the TemplateGenerator Application. Wait for the template to be generated and then go to the stored location of your XML. A new Word file will now be available with the exact same name as your XML. Your Word Template is ready for you to edit.
Editing a Word form
Editing a Word form can be tricky, as it involves working with tables within a Word document. To add your new fields, it is essential to learn the tricks to modify a report. If you want to add a new field, then you need to physically add it into the form. After adding the form, you will likely need to adjust the formatting and import into Microsoft Dynamics GP. Often, you will need to import multiple times as modifications are made to the Word form.
With the newly created Word form, the next step is to open the form in Word. It should look like the Report Writer report, only as a Word document. If you added the field in the Report Writer in GP, then the new field should show up in the same place in Word as it does in the Report Writer. As a best practice, add the fields to the XML before generating the Word form to make the additions easier.
Turn on gridlines
Another technique that makes this easier is to turn on View Gridlines in the table tab layout. When you open Microsoft Word, you will see a "Layout” tab. To get the correct tab to open, select one of the fields. With the selected field, two new tabs will appear in your Microsoft Word called Design and Layout. Select the Layout tab.

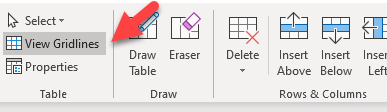
This will make the gridlines on all the tables on the Word document appear.
This is an example of what it looks like before:
And this is what it looks like after:
The main reason to turn these on is that it allows you to split and combine rows to add fields and remove fields. It will also allow you to adjust the spacing for extending fields. For example, if you had a Vendor ID that is 20 characters, yet the field only shows 15 characters, then add the additional characters to achieve the desired quantity of 20. The field will then show the additional values. If the field stays at 15 characters, then the remaining five characters of a Vendor ID that is 20 characters will disappear when printed. The additional items on the table layout tab will allow users to manipulate the columns and rows to their specifications.
Add a field
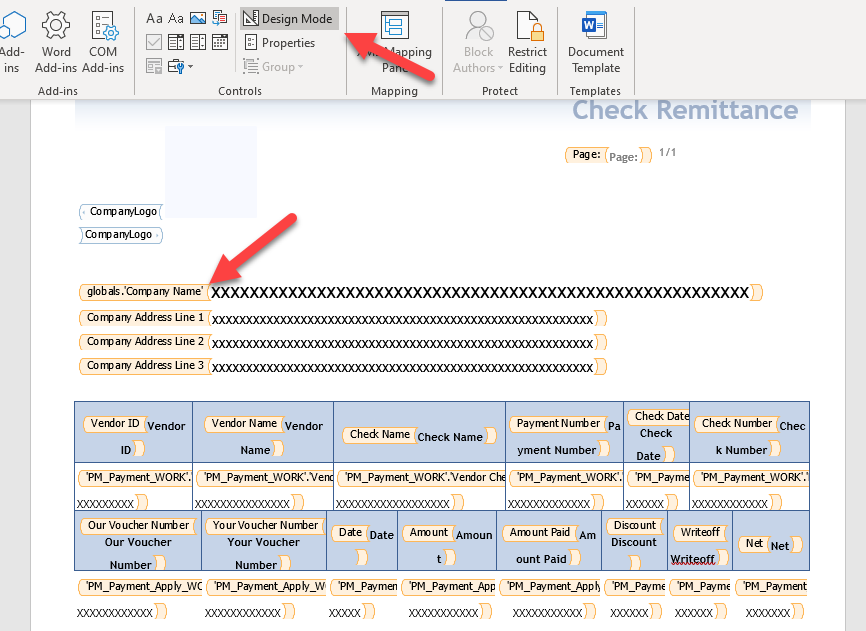
To add a field, turn on Design Mode. If it is on, you will see the Developer tab on the Word bar. If it does not appear, find instructions for adding the Developer tab here. Under the Developer tab, select Design Mode in the controls. Once turned on, it will make adjusting the field names and sizes of the fields easier to manipulate.
To add fields to a Word form that is not in the report, import the XML into the Word form. It is important to have the Word add-in installed from the Microsoft Dynamics GP media for this procedure. Under the Developer tab, select Add Source under the Microsoft Dynamics GP Template section. Then, navigate to your XML export.

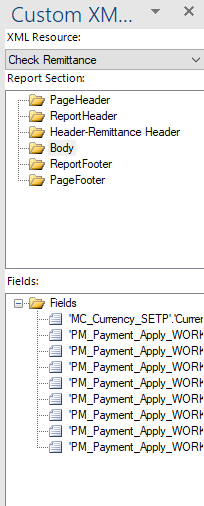
After selecting a source, select Field List. In the dropdown, select the XML export and search for the fields you need.
When adding the fields, turn on the gridlines to make manipulating and adding the data easier. Like all skills, it will take some practice using these tools for you to easily manipulate Word forms. Take time to explore and play with existing templates.
Setup modified report
After manipulation of the Word form is complete, import the form back into Microsoft Dynamics GP in the modified version of the Word form template. After importing, customize the security for the appropriate companies — just as you would when creating a standard report.
With this guide, you can create useful modified Word templates within Microsoft Dynamics GP for whenever you want to modify a PDF or add additional fields to a report. For more information on creating standard Word templates in Microsoft Dynamics GP, check out this blog.
If you would like further assistance, don’t hesitate to contact our experts.
About the Author

Samantha Vislay, MCSE is an Dynamics GP Techno-Functional Consultant located in Pittsburgh, Pennsylvania and has been working with Dynamics GP since 2015. She is skilled in training, implementation, integrations and customizations.
