Knowing how to close out your Microsoft Dynamics GP instance can be difficult if you don’t know best practices and how to streamline the process. At Enavate, we can assist you with just that, letting you in on the tips and tricks that’ll make your Year-End Close process more efficient.
Read on to learn:
- Payables Closing Best Practices
- Tips to Prepare Your 1099s
- Options for Making Updates and Edits to 1099 Details
- How to Efficiently Process 1099s
Dynamics GP Payables Closing Best Practices
Watch this overview of the Dynamics GP Payable Closing Process:
Payables Year-End Close is an optional step and is NOT required to run 1099s. It’s not unusual for some companies to never close out prior years of payables. You can still process your 1099s if you choose not to do this step.
Things to Consider
If you choose to run the Year-End Close process in the purchasing model, timing is very important. You will not be able to post your Payable transactions to the new year prior to closing out the module if you depend on YTD and LYR buckets in SmartLists.
Year-To-Date (YTD) columns and Last Year (LYR) columns in the SmartLists are affected by when the Payables module is closed. However, you can enter transactions into batches and wait to post until after you have run Year-End Close.
If you posted a Payables transaction into the new year prior to closing, Enavate can assist you with running SQL scripts to recalculate your YTD columns.
Close the Purchase Model
To close the Purchase Model, follow these steps:
Navigate to: Purchasing > Routines > Year-End Close
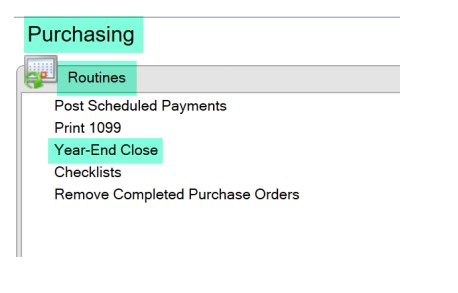
You may choose to print the Year- End Close report during this process— if you do, be sure to print to PDF as it can be a lengthy report.
Preparing 1099s
Before you process your 1099s, follow these tips:
- Create a Smartlist to verify vendors' 1099 information - you can use the Default Vendor Smartlist
- Add the Tax ID Number, 1099 YTD, and DBA Name fields to the standard Smartlist
- Pay close attention to new vendors added in the year you are closing
- NOTE: If the 1099 Box Number and 1099 Address is needed, a custom Smartlist will be needed for these two columns.
See how it's done:
How to Add the 1099 Fields to a Smartlist
- Open Smartlist – Dynamics GP | Smartlist
- Expand the Purchasing Folder
- Expand the Vendors Folder
- Select 1099 Vendors *
- Click the Column button at the top
- Click Add
- Select the following fields while holding CNTRL: 1099 Amount YTD and Tax ID Number
- Click Ok in the Columns window to add these columns
- Click Favorites in the Ribbon
- Give it a new name and click Add without reminder
The Smartlist will now be available with the added columns
1099 Edits
You have options if you need to correct vendors and transactions that were set up incorrectly that are reflecting incorrect information or not as 1099 vendors at all.
Update 1099 Information Utility
Purchasing >> Utilities >> Update 1099 Information
This is usually the best option to make changes, as it allows us to do either the vendor, the transactions, or both at the same time. When you need to change vendors or transactions, types or amounts, the best approach is to change it to be a NOT 1099 and then change it back so all the box numbers, the types, and the values get adjusted in one swoop.
Do your best to test in a test environment and, at the very least, if you can't, make sure you have a backup of your live environment before we're doing any changes so if something does go wrong you do have a point to restore to.
And another big thing to keep in mind is when you're using this update 1099 is to make sure you use restrictions. If you don't use restrictions, it will go and change every single vendor and transaction out there, which can be much more difficult to fix. So, be sure you're using required restrictions.
There are three update options:
- Vendor – Will only change the Vendors 1099 Type and Box Number
- 1099 Transactions – will only change the Type and Box Number assigned to the Transactions
- Vendor and 1099 Transactions – will update both the Vendor and Transactions
When changing the 1099 transaction and the box numbers using the update 1099 information, there's a FROM section and there's a TO section.
 In the FROM section, it is referring to what is currently assigned to the vendor and the transactions.
- Tax Type – Type you want to change from for the Vendors in the Range.
- All – will be all Vendors no matter the options assigned that are withing the Range selected
- Or choose the Type that you want to change from for the Range selected
- Box Number – Box number that you want to change within the range
- Current Box Number that you want to change from for the range selected
- Current Box Number that you want to change from for the range selected
 TO – means what it will be changed to
- Tax Type – the Tax Type that the Vendor will be changed to
- Choose the Tax Type the Vendors will be based for the Range Selected
- Box Number – the Box Number for the Type that the Vendor will be changed to be based off the Range selected
- The box number you want it changed to
Warning: If you do not enter a Range and Insert it, it will change every Vendor based on what you selected. The only way to undo this is to Restore from a Backup or change each Vendor back.
Edit 1099 Transactions
This window allows you to manually edit the 1099 amounts, the box type and the box number only. It is a manual approach that is handled one transaction at a time.
Transaction >>Purchasing >> Edit 1099 Transaction InformationIn the window you can change the tax type, the box number, the amount, or all of them.
This is an editable window, so you click into the field and you change the values that you want to change, and then there's a process button at the top to actually go ahead and update those values in the back end.
This process is good if you just need to make one or two changes to a specific transaction.
1099 PSTL Modifier
The 1099 PSTL Modifier is a great tool if you have imported data but did not flag the transactions with the 1099 information.
What this tool does is it will go and update the Transactions based on what is assigned to the Vendors for the 1099 Type and 1099 Box Number. This tool is limited though as it ran by year and not Vendor.
It requires the Vendor Card to have the correct 1099 Type and Box Number. We can print the report before changes with this tool.
1099 Details Window
The 1099 details window allows you review and edit the 1099 summary amounts. This can be done by month or the whole year. This can be done for any year that is available in GP.
You can also set if the Payee made direct sales of $5,000 or more. You can also mark if Foreign Country or US Possession is used for the year. Amounts should be changed in the Edit 1099 Transactions for the transaction that is wrong.
Watch the 1099 editing process:
When figuring out how to process your 1099s, it’s a good idea to keep the following in mind:
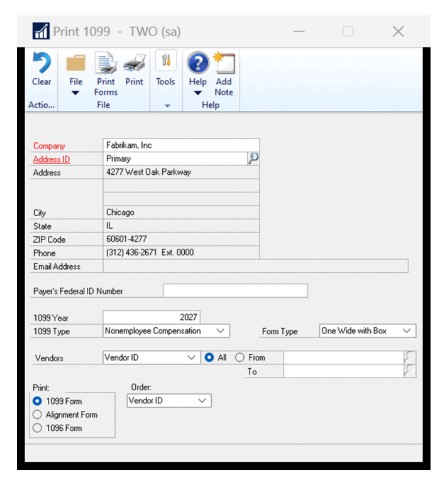
Print your 1099 Edit List
Purchasing > Routines > Print 1099
The form should automatically insert your company name and Fed ID, but you can manually enter it if needed. 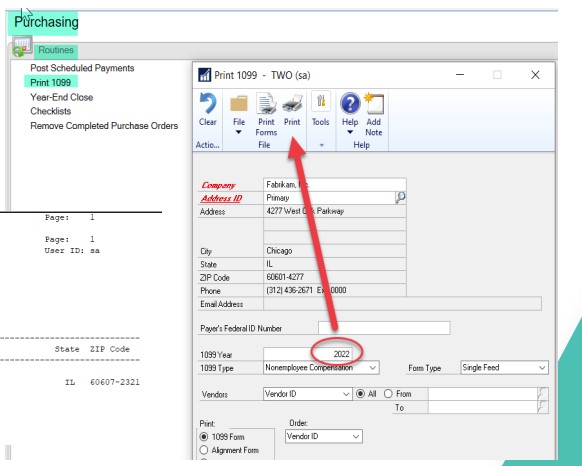
This is an important report to run to make sure that you have an accurate tax ID or social security information for your 1099 vendors. The report supplies you with a dollar amount if it’s above the threshold for the type of 1099 you’re running. Anything below the threshold will not appear.
NOTE:
If you’re not sure where to set up 1099 minimum thresholds, you can do that here:
Purchasing > Setup > Payables > 1099 Setup 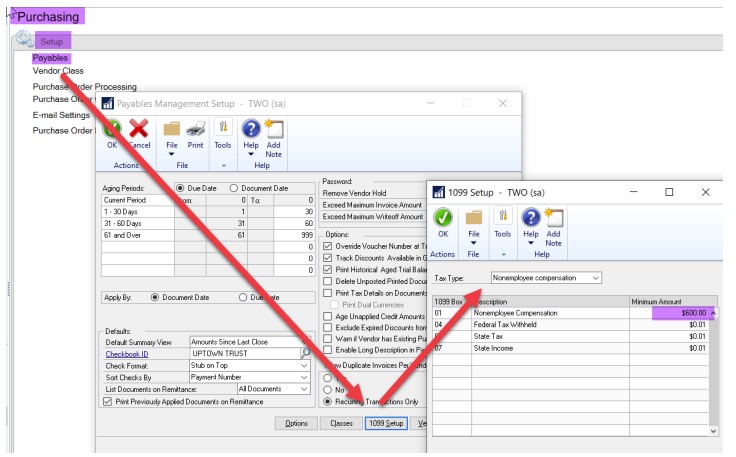
3 places in GP to edit 1099 data
Option 1:
Purchasing Cards
Purchasing > Cards > 1099 Details
To edit 1099 details, you need to display the totals by month. This is the only way to edit 1099 amounts. Once you have made the edits, click save.
There are no limits to the number of times you can make changes to 1099s and process them.
This method is useful when you need to make a quick adjustment to one vendor. 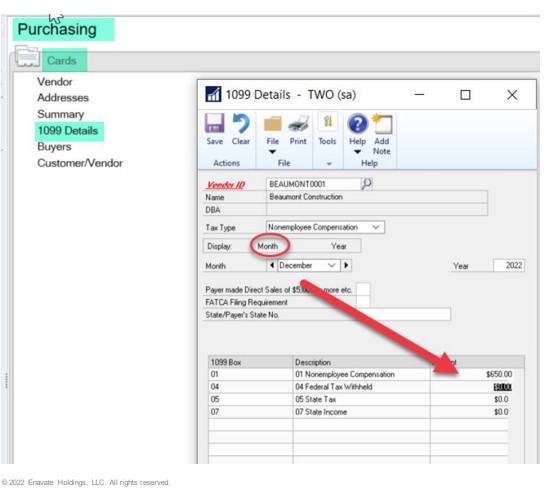
Option 2:
Purchasing Transactions
Purchasing > Transactions > Edit 1099 Transaction Information
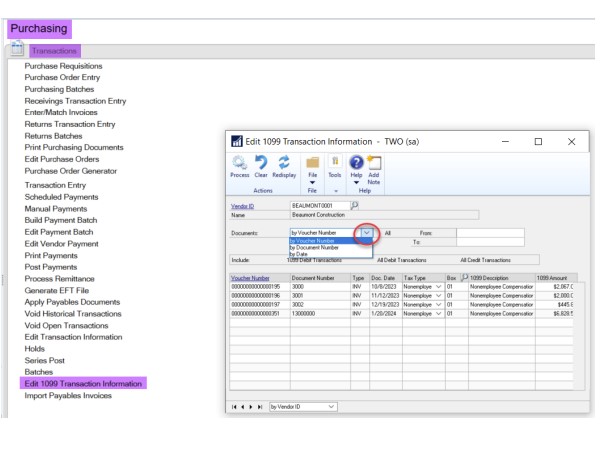
Here, you can make additional changes to your 1099 types by transaction. To make the necessary changes, follow these steps:
- Enter an appropriate Vendor ID
- If desired, restrict by voucher number
- Choose to view by 1099 Debit Transactions, All Debit Transactions, or All Credit Transactions
- NOTE: Each time you make a change, hit “re-display” to view the changed data
- Change the Tax Type and/or Box Number for a specific transaction
- Click “Process”
- Verify the information by viewing the changed 1099 information (Cards > Purchasing > 1099 Details)
NOTE: The document list shows the invoice date, NOT the payment date, so if there are any invoices from 2021 that were paid in 2022 you need to adjust the date under Documents to include 2021.
Option 3:
Purchasing Utilities
Purchasing > Utilities > Update 1099 Information
If you need to make blanket changes to all transactions to a different 1099 type or 1099 Box number for one vendor or a range of vendors, follow these steps:
- Select the radio button next to “Vendor and 1099 Transactions”
- In the “From” restriction on the left do the following:
- Tax Type— the tax type you want to change
- 1099 Box Number— the box number you want to change
- In the “To” restriction on the left do the following: Tax Type— the tax type you want the vendor data to reflect
- 1099 Box Number— the box number you want the vendor data to reflect
- In the “Range Restriction”
- Be sure to enter a restriction here. You can choose between Vendor ID, Vendor Name, and/or Vendor Class. Then click insert to apply the restriction.
- If you do not enter a restriction here, GP will update ALL vendors. This CANNOT BE UNDONE. Be sure you’ve isolated the Vendors or Vendor Class you wish to change.
- Verify the changes and then click “Process” to finalize the changes. A report will print to view the changes.

Processing 1099s in Microsoft Dynamics GP
Once you’re sure that all your 1099 edits are perfect, you can print and process your 1099s.
Printing 1099s with Lines and Boxes
Last year’s update added Lines and Boxes for the NEC form. This year, all forms can be printed with Lines and Boxes. You can find the option on the Print 1099 screen.
Submitting 1099s
If you have 10 or more 1099s, you’ll need to eFile. Since GP doesn’t have an eFile option, we recommend reaching out to Greenshades or another third-party service for assistance. And if you aren’t upgraded to the latest version, your non-NEC forms won’t be able to print with lines. If you’re interested in the Greenshades Year-End Forms solution, please contact sales@Greenshades.com.
Learn more with this on-demand webinar
For any additional questions you may have, we’re here to support you.
If you need assistance or have needs related to customer care and consulting, please reach out to Support@Enavate.com.
For more tips on how to close out your year with less stress, read the other blogs in this series: Year-End Close Process in Microsoft Dynamics GP: Tips and Tricks and Microsoft Dynamics GP Year-End Close: Tips and Tricks for US Payroll.
This post was originally published January 16, 2023 and has been updated for relevancy and accuracy.