When going about a day of seemingly endless data entry in Microsoft Dynamics SL, do you find yourself thinking, there must be an easier way to do this?
The good news is there are several ways to make these tasks easier and more efficient. Below we’ll review options that will change the way you think about and use the Journal Transactions screen.
Systematic Batch Creation
As many Dynamics SL users may already know, the Auto Reversing checkbox has been available on Journal Transactions for quite some time. It is meant to simplify accrual entries, allowing them to auto “reverse” in the following period when actuals post.
However, as of SL version 2011, the Correct Journal Transactions button was introduced, just to the right of the Batch Number field. This button allows one to Reverse, Reverse and Correct, or Copy an existing released journal entry. Though it’s been available on the form for several years now, many have yet to capitalize on its efficiency. This button has much to offer in the way of accuracy and time savings.
To use the Correct Journal Transaction button and screen:
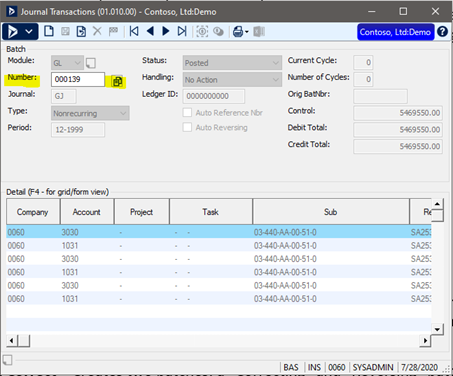
1. Browse to General Ledger > Input > Journal Transactions
2. Locate a batch to work with by pressing F3 on the Number field.
3. Select a Released batch. Click OK to load it to the Journal Transactions screen.
4. Click the Correct Journal Transactions button ![]() located right adjacent of the Number field.
located right adjacent of the Number field.
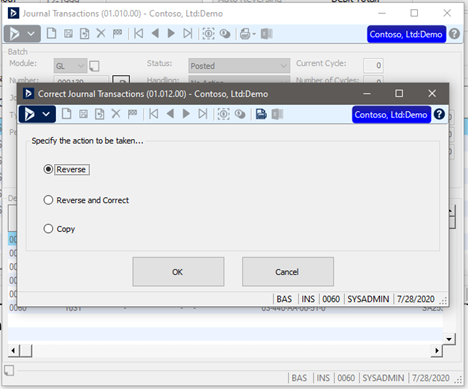
You will be presented with the following options:
-
- Reverse – Creates a “Reversing” batch that is identical to the original batch, with the exception that the debits and credits are reversed. The Period will default to the original batch period, however, it can be changed if so desired.
- Reverse and Correct – Creates two batches: a “Correcting” and a “Reversing” batch. The Correcting batch is an unreleased duplicate of the original batch allowing all fields to be edited as needed. The Reversing batch is identical to the original batch except the debits and credits have been reversed. The only fields that may be edited are Batch Handling and Period.
- Copy – Creates a new batch identical to the original batch and all fields can be modified. The period defaults to the current period.
5. Click OK to accept the selected option. From there, the batch or batches will be created automatically. Then, you can review or edit as needed, after which Release, then Post.
Tips
- If you click the Correct Journal Transaction button, then decide this isn’t the batch you want to work with, click the Cancel button, NOT the red X (form close) in the upper right, otherwise, Dynamics SL will still create a new batch or batches.
- If you do accidentally create a Batch, you can delete it using the Delete X on the Tool Bar.
- Note that on auto-created batches, the Orig Batnbr field is populated with the source Batch Number. To see batches that have a copied source or originating batch number, you can run:
- GL Batch Register report with a period range and Select filter on Batch.OrigBatnbr >= 0
- Batches Quick Query with a filter on Original Batch Number >= 0 and Module = GL
Automating Recurring Entries
The Recurring batch type is a powerful “set it and forget it” option for managing repetitive entries in Journal Transactions often leveraged for scheduled amortizations, depreciations or installment items, to name a few.
Essentially, Recurring batches are preconfigured entries with assigned intervals and a number of intervals that can later be automatically generated at the push of a button via the Generate Recurring screen.To set up a Recurring Journal Transaction Batch:
1. Browse to General Ledger > Input > Journal Transactions
2. Set the Batch type to Recurring - Notice that the Current Cycle and Number of Cycles fields are now enabled.
3. Key the journal entry as you typically would for the period, then hit Save. Determine what to set the newly enabled Current Cycle and Number of Cycles values to.
-
- Current Cycle – This is number of fiscal periods between generations of a recurring batch. For example: A value of 1 would slate the entry to be auto created every month; a value of 2, every other month; 3 once a quarter, and so on.
- Number of Cycles – This is number of times to generate a recurring batch. For example: if Current Cycle was 1 and Number of Cycles was 12, that would set it up for a full 12 months. Note that, after the last posting cycle, SL deletes the recurring batch.
4. Set the batch Handling to Release Later or Release Now, then Save and close the form. This will set the batch to a “Balanced” status in the Batch List, but it will NOT show on Release GL Batches.
To later generate the Recurring Transactions:
1. Browse to General Ledger > Processes > Generate Recurring
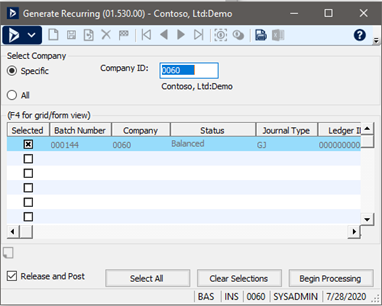
2. Select one of the following actions:
-
- Specific – To type a company ID in Company ID to generate transactions for just the one company.
- All – To generate recurring transactions for all companies in a shared database.
3. Then select one of the following options:
-
- Release and Post to release and post the selected batches to the general ledger. If you do not select this option, you will need to visit Release GL Batches and Post Transactions to complete processing.
- Selected box next to individual batches to indicate which to process.
- Select All button to select all the batches for processing.
- Clear Selections button to deselect all the batches.
4. Lastly, click Begin Processing to generate the recurring transactions for the period.
Generate Recurring is a screen that’s typically visited once per month; however, not all batches need to be processed at the same time and can be done at different times of the month as needed. Also, Dynamics SL will not generate a batch more than once for a given configured interval or period. Only the entries set to post to the current or prior periods are displayed in the processing window.
If an entry has already been generated for the current or prior periods, it will not be displayed again for processing in the same period. As such, there is no risk of inadvertently generating the same entry twice in one period.
Conversely, if a recurring entry is not processed for several months, when running Generate Recurring, Dynamics SL will generate a batch for each month to bring the recurring batch current as per the configured Cycle values.
Tips
- For entries that would normally expire during the last period of the year, such as a Depreciation schedule), you may want to enter one more period than necessary. This would allow you to edit the transaction after year-end without the need to reenter all the detail accounts and subaccounts – as a completed Recurring Batch will be automatically deleted by SL.
- To ensure the length of the recurring batch is correct, you can multiply the Current Cycle by the Number of Cycles to get the length of the recurring batch. For example, if you’re using a quarterly recurring batch for 12 months, the Current Cycle of 3 is entered, and the Number of Cycles is set to 4 (3 x 4 = 12).
- Use Initialize Mode to make changes to Current Cycle or Number of Cycles for the original recurring batch. Proceed with caution when leveraging this mode. See the Safety Tip
- To see a list of Recurring batches you can run:
- GL Batch Register Report with a period range and a Select filter on Batch.BatType = R
- Batches Quick Query with a filter on Batch Type = R and Module = ‘GL’
Templates
Another method that boosts journal entry efficiency is leveraging Templates. Many users are likely familiar with Templates when using Report Selection filters; however, Templates are greatly under-utilized in concert with data entry. In the context of journal entries, Templates behave similarly to Manual or Copied batches in that they both can save or reuse existing transaction sets for repeat entry on new batches. While both greatly minimize data entry effort, I do find Templates to be a more efficient option when working with repetitive entries.
Unlike Manual or Copied batches, Templates allow the user to save data entry detail to a meaningfully named Template ID outside of the Journal Transactions batch list. It can then be easily located in the smaller Template list, which can be “pasted” to the Journal Transactions screen at time of use. Templates can be used repeatedly and edited as needed each time without cluttering the Journal Transactions batch list or Batch Register report with non-posting “Manual” batches.
To save an entry you want to reuse via the Template method:
1. Select the Application button  at the upper left corner of the entry screen.
2. Locate and select the Template menu item.
3. On the Template screen, type in a Template ID and Description, then set the Visibility setting.
4. Select what data to save in the Application Field Selection > Section. In this scenario, you will likely want to select Detail.
5. Click Save to preserve the Template entry.
To use a saved Template on a new Journal Transaction batch:
1. Select the Applicationbutton at the upper left corner of the entry screen.
2. Locate and select the Template menu item.
3. On the Template screen, hit F3 on the Template ID field and select your Template.
4. Once selected, hit the Paste button to populate the form with your saved entry.
5. Once loaded to the new Journal Transactions batch, you are allowed to edit it as needed prior to Release and Post.
Tips
- This method can be used on many screens throughout SL.
- Templates are unique to each screen.
- They are easily deleted when no longer need them.
- Templates can be made private (only you can access) or public (everyone can access).
- To update an existing Template, you can save the edited Entry in Journal Transactions over the existing Template ID to update it for the next use.
Working with Excel
Another handy option to consider is Excel. Where would any of us be without our spreadsheets? What I like about leveraging Excel in this context is you can stage and work with Journal Transaction data in a spreadsheet before using it in the Journal Transactions screen. By keeping the column formatting of the spreadsheet aligned with the Journal Transactions detail grid, it becomes a simple copy/paste action once the data is finalized and ready for entry.
This is helpful with:- Calculations that are standardized on entry data that need to be performed in advance and repetitively.
- When there is a need for portable preliminary review, corrections and approval prior to entry.
- Data export from Quick Query to Excel to build a new Entry from existing transactions. This is often associated with planning or budgeting data manipulation for forecasting or statistical data postings.
There are so many reasons Excel should be part of your data entry arsenal!
Bonus Material
Have you ever released a Journal Transactions batch then realized after the fact that you forgot important details? Mistakes happen, even with Templated or Copied batches. The good news is, if the batch is not yet at the Posted status, you can use Initialize Mode to edit an unposted GL batch to recover from the oversight.
For example, if a $1,000 credit and offsetting debit should have been changed to $1,500, you can make that change before the batch is finalized and posted by accessing the batch using Initialize Mode. If it is already posted, you can leverage the Reverse and Correct option covered above.
To access Initialize Mode:
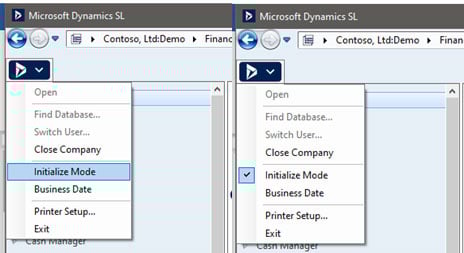
- Ensure all screens except the Microsoft Dynamics SL menu are closed.
- From the Application Menu, put Dynamics SL into Initialize Mode by clicking the menu item. A check mark will appear next to the menu item.
Note: Your account will need to have Init Level Access Rights to Journal Transactions to do this. Also, always exercise caution when using Initialize Mode. If you find you cannot edit the unposted batch despite the Initialize Mode check mark being active, your access rights will need to be updated to provide Init Level access to Journal Transactions. For more details on Access Rights in Dynamics SL, be sure to check out the User Administration Series: Part 1 and Part 2.
Safety Tip about Initialize Mode
It is imperative to note that any user granted Init Level Access to Journal Transactions will have the ability to view released and posted data from the sub-modules, as well as the ability to delete or modify any unposted data from any module.
With that, it suffices to say there are many simple options to improve data entry productivity in Dynamics SL. We have only just begun to scratch the surface!
Talk to our Enavate team of experts about how Microsoft Dynamics SL can make the data entry process more efficient.
About the Author

Paulette St George is a Senior Technical Professional, Customer Support, for Enavate Managed Services, a DXC Services Partner. She has more than 25 years of experience in back office technology with a primary focus in Microsoft Dynamics SL and related solutions. She has served as a solution architect and designer, as well as developer. Currently she functions as a Senior Technical Consultant for ENAVATE by supporting Microsoft Dynamics, Microsoft SQL Server as well as varied Procurement solutions and Business Intelligence reporting technologies. She enjoys spending time cooking and creating healthy, clean and exciting meals, and spends much of her free time reading and researching many different topics of interest from Astronomy, Food Science and even Homeopathic Medicine. She lives in Southern California splitting her time between Orange County and Big Bear Mountain, enjoying the beautiful and varied weather SoCal has to offer.