In Part 1 of this two-part blog series, we covered the not often considered mid-year phase of 1099 data management and processing.
The guidance provided sets the stage for success during year-end processing, which we will focus on here. So, let’s fast-forward to December and cover the tasks completed during the year-end phase.
The year-end phase involves the following tasks:
- A full review of all 1099 vendors and their 1099 balances.
- Corrections to vendor 1099 settings and balances as needed.
- Installation of 1099 year-end updates if there are reporting changes for the year.
- Printing and processing 1099 reports and electronic data.
- Closing the current calendar year and opening the next year.
Many of the year-end 1099 tasks should look familiar and even be expected. You will likely notice that the first couple of tasks above are also in Part 1 of this series, where we covered mid-year tasks. It illustrates how important reviews are to the success of 1099 processing.
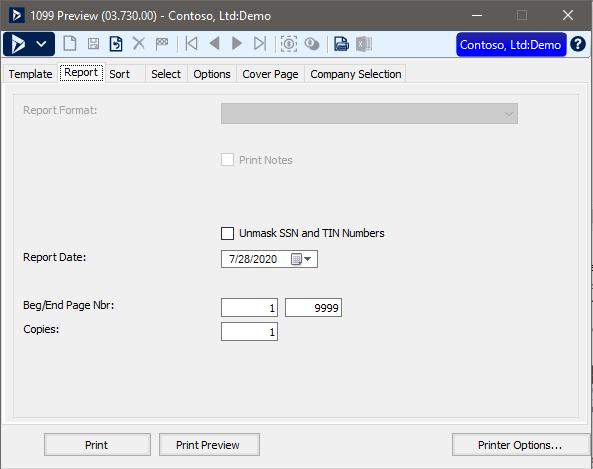
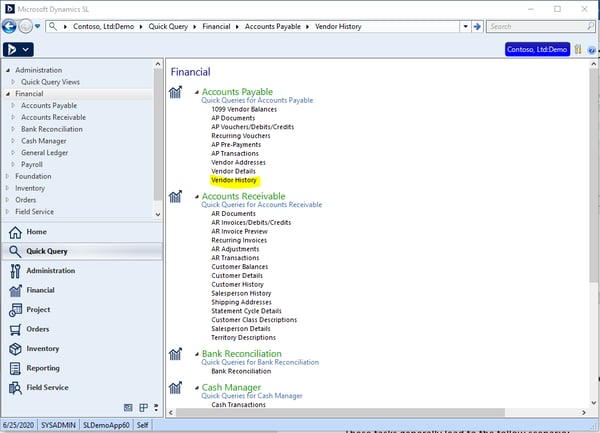
To begin your year-end full review, start with running the 1099 Preview report to see all denoted 1099 vendors as well as captured balances.
To review and print the 1099 Preview report:
- From AP Module > Reports, open 1099 Preview.
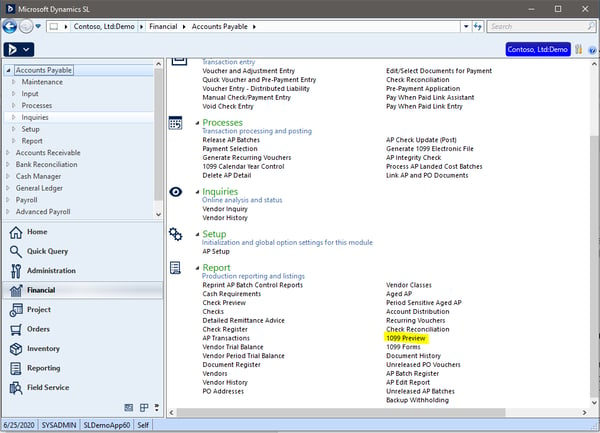
- Press Print or Print Preview.
If you see last year’s 1099 Data, then the 1099 Calendar Year Control is not reflecting in the actual current calendar year as the Current 1099 Year. So, it’s likely SL shows the calendar year as the Next 1099 Year. This indicates that the oldest year was not purged. To fix this, you can purge the Oldest Year (see instructions in Part 1 of this blog series).
Alternatively, you can go to the Options tab of the report and click the Next 1099 Year checkbox and Print the report again.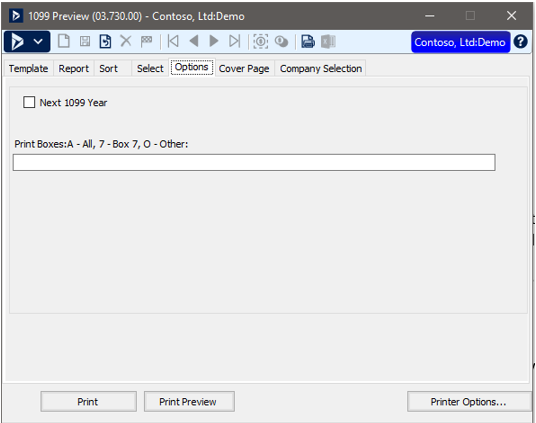
- Once you confirm the report output, use it to compare to Vendor Payment History details.
Comparing these 1099 preview values to Vendor Payment History is a good gage of whether data was missed at entry or the Vendor was not set up correctly.
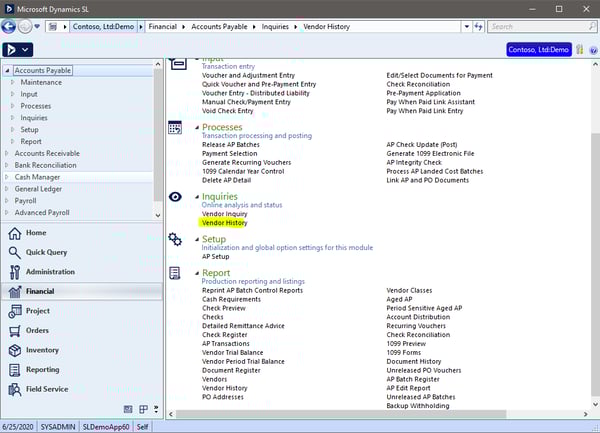
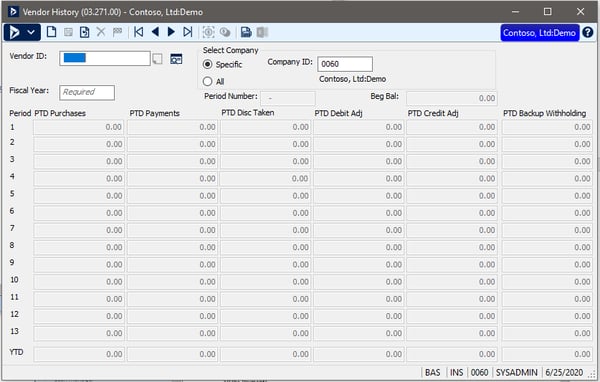
To review and print Vendor Payment History:
- From AP Module > Reports, open Vendor History.

- On the Select tab, filter the data to the Fiscal Year respective to the Calendar Year.
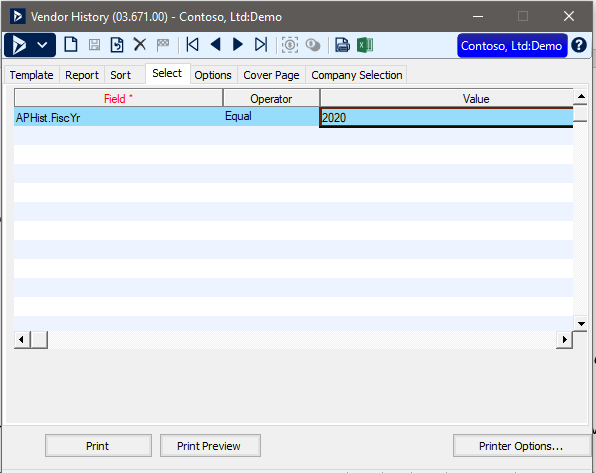
NOTE: If your fiscal year covers 2 calendar years, you will need to report on more than one year. Use the “In” Operator in place of “Equal”, then type both years in the Value cell, separated by a comma like this: 2020,2021 - Print the report and review the Periods of Payment Data to ensure they align with the previously printed 1099 Preview.
Another report that provides Payment History data, but in a different format, is the Vendor History Quick Query. It can also be filtered on Fiscal Year.
Lastly, the Vendor History screen can provide Payment History data for one-off lookups.
Once you complete the above review task, you may encounter the following scenario:
“We are reviewing the 1099 Preview. Why do the balances not match Vendor Payment History?”
This question is common and the result of either a data entry or Vendor setup oversight. This can also be attributed to payments that simply do not qualify for 1099 tracking, which can be confirmed by reviewing Vendor documents and details.
In an ideal scenario, Initialize Mode would have been leveraged throughout the year to correct the 1099 balances on the Vendor 1099 Info tab, and that would still be the best option to bring 1099 Data into alignment with Payment History at year-end.
Here is a recap on how to correct missed 1099 data for a vendor:
- Ensure all screens except the SL menu are closed.
- From the Application menu, put SL into Initialize Mode by clicking the menu item. A check mark will appear.
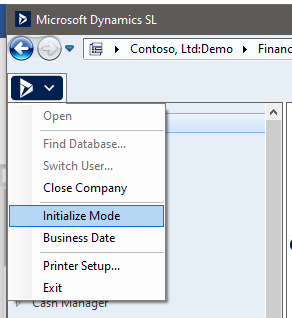
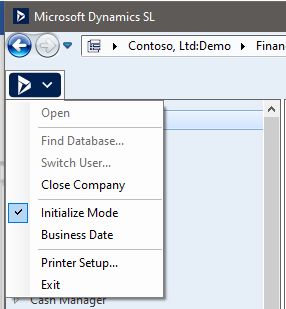
- Open Vendor Maintenance, enter a Vendor ID, then navigate to the 1099 Info Tab.
- Update the vendor’s 1099 settings and defaults. You will notice that the 1099 balance fields are enabled. Initialize Mode will allow you to update balances that were missed.
NOTE: You may find that the balance fields are not enabled even with Initialize Mode turned on. This is an indication your account does not have Initialize Mode permissions to Vendor Maintenance. To remedy this, an SL Administrator will need to alter Access Rights to the screen to accommodate this activity. For more information on Access Rights and User Administration in Microsoft Dynamics SL, be sure to check out the User Administration Series: Part 1 and Part 2.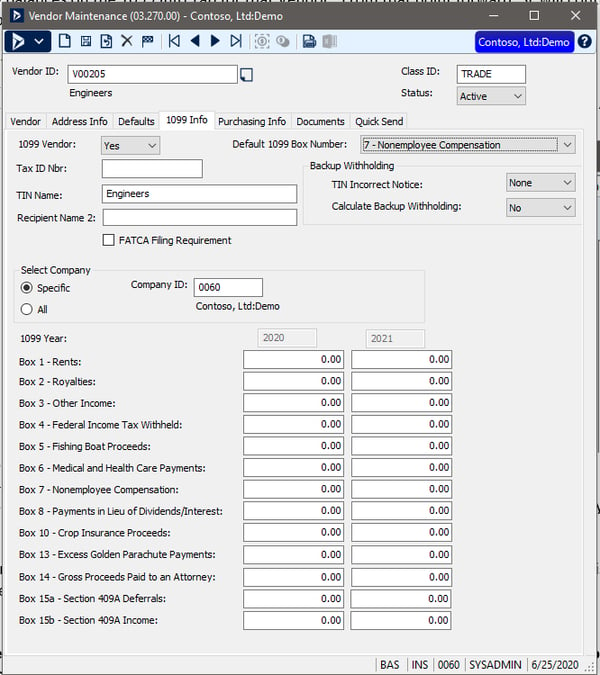
- Save your changes and close the screen.
Now, if data was overlooked throughout the year and no previous corrections were made, there is likely too much data to correct by hand using the steps above. Fortunately, there is a hybrid solution Enavate can assist with that involves using the Rebuild 1099 History process. There are a few things that must occur before leveraging this solution:
- Ensure there are no manual Vendor 1099 balance changes that were previously made that would be at risk of loss. If updates were made, reach out to an Enavate expert who can help you weigh options and outcomes.
- If you decide to move forward on a full 1099 history rebuild for the year, users will need to correct/update Vendor 1099 settings that were overlooked.
- Next, one of our consultants can use those updated Vendor 1099 Info settings to retroactively “tag” Voucher transactions for 1099 tracking.
- From there, the AP Integrity Check > Rebuild 1099 History process can be run to rebuild 1099 History data for the respective year.
Now that the data has been reviewed and deemed correct, the next task is to print 1099 Forms as well as run Generate 1099 Electronic File if sending federal data electronically. However, consider the following before charging ahead:
- Have the preprinted 1099 Forms been purchased?
- Are there any known changes in reporting requirements or form changes for the respective calendar year?
- Is Microsoft providing 1099 year-end updates this year?
1099 reporting and form changes can manifest in a number of ways — box number changes, layout changes, electronic data formatting changes and so on. Enavate can help with all of this, as well as advise what changes are needed for this year and next year, as information becomes available.
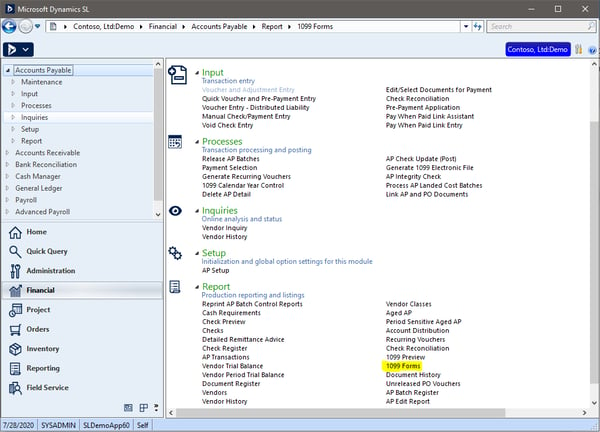
To print the 1099 Forms:
- From AP Module > Reports, open 1099 Forms.
- Load either spare blank forms or blank paper, then press Print.
NOTE: If this is the first test print, I recommend blank paper for the initial rough alignment check. This will help minimize wasted forms.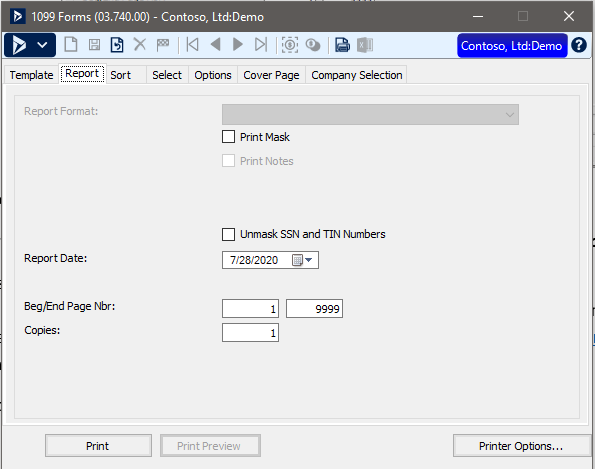
- Review the printed forms for alignment and accuracy before completion of all final form print outs.
When test printing your 1099s, you may find yourself asking:
“When printing our 1099s, they appear to be misaligned with the new form. What should we do?”
Alignment issues can be due to changes made to the government-issued form but can also be as simple as printer-specific alignment issues. To resolve, reach out to Enavate and have an expert evaluate the need for installation of year-end updates provided by Microsoft for mainstream supported versions of Dynamics SL as well as assist with minor alignment adjustments.
When you opt to generate an electronic 1099 file:
- From AP Module > Processes, open Generate 1099 Electronic File.
- Review, select and set your options; provide an output path and select Begin Processing. Be certain the correct year is selected. If it is not, this indicates that the oldest year was likely not purged. To fix this, you can purge the Oldest Year (see instructions in Part 1 of this blog series).
NOTE: For details and definitions of the various options and settings of this screen, press F1 for Dynamics SL online Help. For 1:1 assistance, reach out to Enavate and we can provide detailed guidance.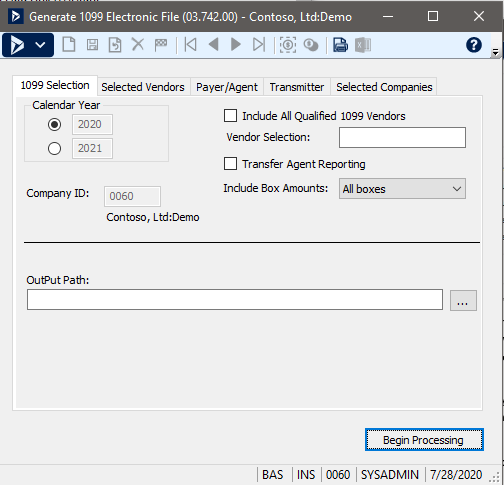
- Press OK upon processing completion. There will be a file ready for you to upload in the output path you provided.
A couple weeks after uploading the file, you may encounter the following:
“We received a notice about file errors on our 1099 e-file. How do we fix it?”
If you decided to send federal 1099 data electronically, by using Dynamics SL’s Generate 1099 Electronic File, then as long as Dynamics SL is current on the latest version of Microsoft-provided year-end updates, the file format will be compatible with federal e-filing requirements. If there are errors reported after filing, reach out and we can assist with getting the latest updates applied on any mainstream supported version.
Note: For some non-mainstream versions of Dynamics SL (example: SL 2011), there are 3rd party solutions available for purchase that can be applied when Microsoft updates are not provided. Your Enavate account manager can provide you with options.
Once you have completed the 1099 data review and reporting tasks, you can breathe a sigh of relief as the bulk of the work is now done. However, we cannot forget the final task that needs to be completed right around the new year: closing the previous 1099 year and opening the next 1099 year.
This is very important because these controls mitigate accidental writing of checks to the previous year after all 1099 balances have been finalized. So just as was done in the mid-year phase, we will revisit 1099 Calendar Year Control.
To control what year is open and available:
- From AP Module > Processes, open 1099 Calendar Year Control.
- You will note that the Process Option defaults to Change Status.
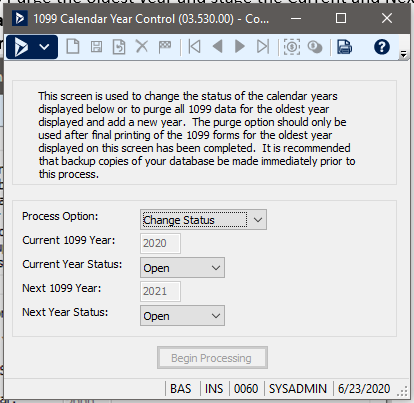
- You will also notice that Current and Next 1099 Year Status are enabled. As this is currently the year-end phase, you will want the change Current 1099 Year to Closed and Next 1099 Year to Open. This will ensure that checks can only be dated to the Next 1099 Year, which is the current calendar year.
You do not want to purge any data at this point, as 1099 final printing is likely not completed and there could be revised 1099s that need to go out later on. When the mid-year phase comes around again in late spring, you will be ready to purge the oldest year and start the cycle over again.
This brings us to the conclusion of the year-end phase of 1099 data management and processing, and this two-part blog series. It is my hope that these guides illuminate the distinct differences in 1099 data management and processing that take place at different times of the year. When adopted, this two-phased methodology can proactively mitigate some of the common issues encountered at year-end and empower you to take control of all things 1099.
If you have any questions, or there is anything we can help with, please don’t hesitate to reach out to Enavate! Contact us here.
About the Author

Paulette St George is a Senior Technical Professional, Customer Support, for Enavate Managed Services, a DXC Services Partner. She has more than 25 years of experience in back office technology with a primary focus in Microsoft Dynamics SL and related solutions. She has served as a solution architect and designer, as well as developer. Currently she functions as a Senior Technical Consultant for ENAVATE by supporting Microsoft Dynamics, Microsoft SQL Server as well as varied Procurement solutions and Business Intelligence reporting technologies. She enjoys spending time cooking and creating healthy, clean and exciting meals, and spends much of her free time reading and researching many different topics of interest from Astronomy, Food Science and even Homeopathic Medicine. She lives in Southern California splitting her time between Orange County and Big Bear Mountain, enjoying the beautiful and varied weather SoCal has to offer.