In the middle of the summer, the last thing any of us are likely thinking about are the 1099s from last year; but ironically, we should be.
In this blog, I will shed light on the first of two distinct phases of 1099 data management and processing, as well as provide steps to ensure success, covering the common processes and scenarios that will empower you to manage 1099s seamlessly and efficiently.
Many consider 1099s a year-end task relegated to December, January and maybe even February. Yet, now is the time you should also ask yourself, “Could there possibly be any more revised 1099s that need to go out?” If not, that means you need to purge data and prepare for the current and next 1099 years, which begins the first phase of 1099 data management and processing.
So, what are these two phases of 1099 data management? I have come to refer to them as the mid-year phase, which will be covered here in Part 1; and the year-end phase which we will cover in Part 2 of this series. With the adoption of the proactive mid-year phase, much of the rush and panic associated with the year-end phase can be vastly minimized.
The mid-year phase involves the following tasks:
- Confirmation that no more revised 1099s need to go out.
- Purging the oldest 1099 year’s data, which will stage the current and following year.
- A review of any newly created vendors that may qualify for 1099 reporting.
- Corrections to vendor 1099 settings and balances as needed.
Let’s get into more detail on the mid-year tasks.
It is probably safe to say that by summer, there will no longer be requests for a revised 1099. As such, it’s time to purge the oldest 1099 year to get things current and mitigate future obstacles. The most common obstacle being this common user complaint:
“We are getting a check date error while trying to print checks! What’s going on?”
This error is advising the user they are trying to write a check to a date not in an open 1099 Calendar Year. This generally happens when the oldest year has not yet been purged. As such, SL does not see an open calendar year for AP payment processing.
To prevent this, one will need to visit 1099 Calendar Year Control. In there, you can control what years are available to users for check processing, as well as purge the oldest year(s) as needed. Sometimes, if it has been neglected for a couple years, it will need to be run twice to get things current. Be sure to back up the data before running the purge!
Follow these steps to purge the oldest year and set the current and next 1099 years:
- Open 1099 Calendar Year Control in the AP Processes menu.
- Change the Process Option to Purge Oldest Year. Press Begin Processing.
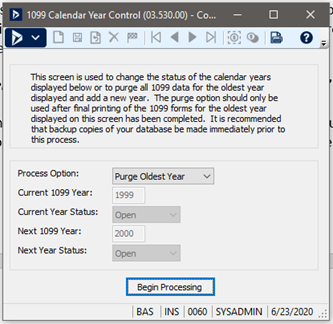
- You will see a processing window pop up and quickly complete the purge. Click OK.
- Review the screen and note that the years have “shifted.” The oldest year is gone, and a new year opened for the Next 1099 Year.
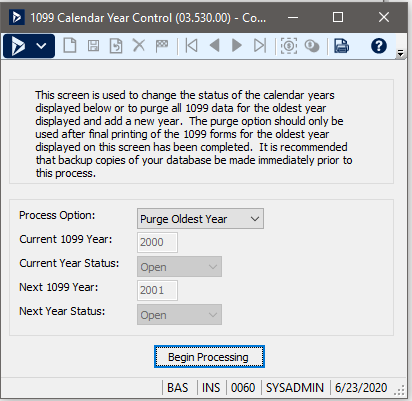
- If, like the demo data pictured above, the system is behind, run it again until your Current 1099 Year is the current calendar year, and the Next 1099 Year is the next calendar year.
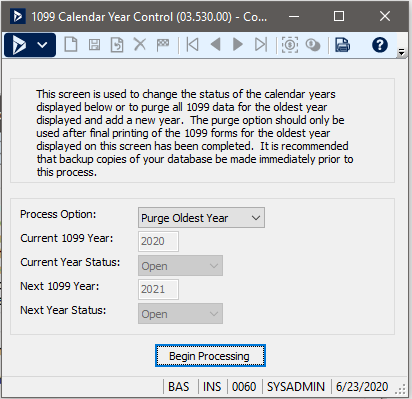
- Once completed, close the screen.
You may have deduced that SL only keeps two 1099 years active at a time. So, to print checks, the date of those checks must fall into an Open 1099 year, which takes us to the next common ask:
“How do we prevent posting of checks to a prior year or the next year?”
That’s a valid concern that can occur due to typos, especially around the turn of the year. Again, this is easily and proactively controlled via 1099 Calendar Year Control. Once the purge has been completed, you will set what year is available to cut checks to.
To control what year is open and available:
- Open 1099 Calendar Year Control.
- Note that the Process Option defaults to Change Status.
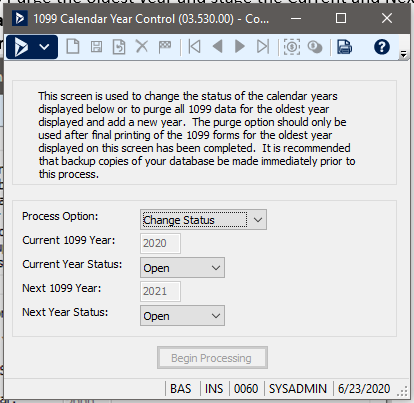
- You will also notice that the Current Year Status and Next Year Status dropdowns are enabled. As this is currently mid-year, just after the purge was completed, change Current 1099 Year to Open and Next 1099 Year to Closed and click Save. This will ensure that checks can only be dated to the current 1099 year.
Last, but certainly not least of the mid-year tasks, is reviewing vendors that have recently been added to Dynamics SL. It’s a good idea to periodically review newer vendor accounts to ensure they were correctly setup for 1099 capture. However, you may find yourself asking:
“We have a vendor that was overlooked for 1099 setup and data has already been posted. What can I do?”
If you find that you have vendors that were overlooked, simply complete the setup of the 1099 Info Tab for the vendor; then using Initialize Mode, update the 1099 balances on the 1099 Info Tab for that vendor. From that point forward, SL will continue to update 1099 balances for the vendor.
To correct missed 1099 data for a vendor:
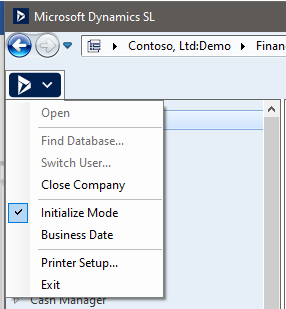
- Ensure all screens but the SL menu are closed.
- From the Application Menu, put SL into Initialize Mode by clicking the menu item. A check mark will appear.

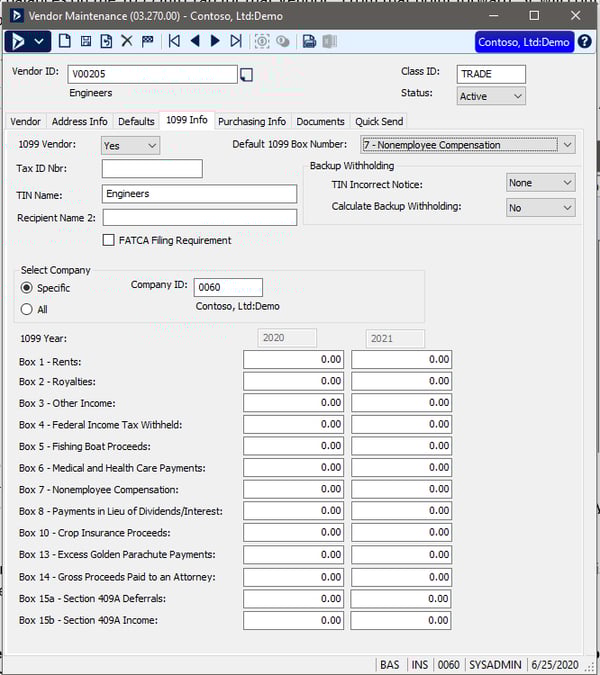
- Open Vendor Maintenance and navigate to the 1099 Info Tab.
- Update the vendor’s 1099 settings and defaults. You will note that the 1099 balance fields are enabled. Initialize Mode will allow you to add the balances that were missed.
NOTE: You may find that the balance fields are not enabled even with Initialize Mode turned on. This is an indication that your account does not have Initialize Mode permissions to Vendor Maintenance. To remedy this, an SL Administrator will need to alter Access Rights to the screen to accommodate this activity. For more information on Access Rights and User Administration in Microsoft Dynamics SL, be sure to check out the User Administration Series: Part 1 and Part 2.
- Save your changes and close the screen.
Once this has been done, do not run the Rebuild 1099 History process. Doing so will wipe out any manually entered balances on the 1099 Info Tab.
This bring us to the end of the proactive mid-year phase of 1099 data management and processing. I encourage all users to proactively check Vendor 1099 Info tab setups to ensure they are properly configured for 1099 data capture. This will help eliminate struggles at year end. Be on the look-out for Part 2 of this series, we’ll fast forward to December, to the year-end phase.
I hope this helps illuminate the nuances of 1099 data management and processing, as well as empowers you to take control of all things 1099. If you have any questions, please don’t hesitate to reach out to our SL team of experts.
About the Author

Paulette St George is a Senior Technical Professional, Customer Support, for Enavate Managed Services, a DXC Services Partner. She has more than 25 years of experience in back office technology with a primary focus in Microsoft Dynamics SL and related solutions. She has served as a solution architect and designer, as well as developer. Currently she functions as a Senior Technical Consultant for ENAVATE by supporting Microsoft Dynamics, Microsoft SQL Server as well as varied Procurement solutions and Business Intelligence reporting technologies. She enjoys spending time cooking and creating healthy, clean and exciting meals, and spends much of her free time reading and researching many different topics of interest from Astronomy, Food Science and even Homeopathic Medicine. She lives in Southern California splitting her time between Orange County and Big Bear Mountain, enjoying the beautiful and varied weather SoCal has to offer.
